Beautiful Soup 4.2.0 文档

Beautiful Soup 4.2.0 文档

_static/cover.jpgBeautiful Soup 是一个可以从HTML或XML文件中提取数据的Python库.它能够通过你喜欢的转换器实现惯用的文档导航,查找,修改文档的方式.Beautiful Soup会帮你节省数小时甚至数天的工作时间.

这篇文档介绍了BeautifulSoup4中所有主要特性,并且有小例子.让我来向你展示它适合做什么,如何工作,怎样使用,如何达到你想要的效果,和处理异常情况.

文档中出现的例子在Python2.7和Python3.2中的执行结果相同

你可能在寻找 Beautiful Soup3 的文档,Beautiful Soup 3 目前已经停止开发,我们推荐在现在的项目中使用Beautiful Soup 4, 移植到BS4

寻求帮助

如果你有关于BeautifulSoup的问题,可以发送邮件到 讨论组 .如果你的问题包含了一段需要转换的HTML代码,那么确保你提的问题描述中附带这段HTML文档的 代码诊断 [1]

快速开始

下面的一段HTML代码将作为例子被多次用到.这是 爱丽丝梦游仙境的 的一段内容(以后内容中简称为 爱丽丝 的文档):

html_doc = """
<html><head><title>The Dormouse's story</title></head>
<body>
<p class="title"><b>The Dormouse's story</b></p>

<p class="story">Once upon a time there were three little sisters; and their names were
<a href="http://example.com/elsie" class="sister" id="link1">Elsie</a>,
<a href="http://example.com/lacie" class="sister" id="link2">Lacie</a> and
<a href="http://example.com/tillie" class="sister" id="link3">Tillie</a>;
and they lived at the bottom of a well.</p>

<p class="story">...</p>
"""

使用BeautifulSoup解析这段代码,能够得到一个 BeautifulSoup 的对象,并能按照标准的缩进格式的结构输出:

from bs4 import BeautifulSoup
soup = BeautifulSoup(html_doc)

print(soup.prettify())
# <html>
#  <head>
#   <title>
#    The Dormouse's story
#   </title>
#  </head>
#  <body>
#   <p class="title">
#    <b>
#     The Dormouse's story
#    </b>
#   </p>
#   <p class="story">
#    Once upon a time there were three little sisters; and their names were
#    <a class="sister" href="http://example.com/elsie" id="link1">
#     Elsie
#    </a>
#    ,
#    <a class="sister" href="http://example.com/lacie" id="link2">
#     Lacie
#    </a>
#    and
#    <a class="sister" href="http://example.com/tillie" id="link2">
#     Tillie
#    </a>
#    ; and they lived at the bottom of a well.
#   </p>
#   <p class="story">
#    ...
#   </p>
#  </body>
# </html>

几个简单的浏览结构化数据的方法:

soup.title
# <title>The Dormouse's story</title>

soup.title.name
# u'title'

soup.title.string
# u'The Dormouse's story'

soup.title.parent.name
# u'head'

soup.p
# <p class="title"><b>The Dormouse's story</b></p>

soup.p['class']
# u'title'

soup.a
# <a class="sister" href="http://example.com/elsie" id="link1">Elsie</a>

soup.find_all('a')
# [<a class="sister" href="http://example.com/elsie" id="link1">Elsie</a>,
#  <a class="sister" href="http://example.com/lacie" id="link2">Lacie</a>,
#  <a class="sister" href="http://example.com/tillie" id="link3">Tillie</a>]

soup.find(id="link3")
# <a class="sister" href="http://example.com/tillie" id="link3">Tillie</a>

从文档中找到所有<a>标签的链接:

for link in soup.find_all('a'):
    print(link.get('href'))
    # http://example.com/elsie
    # http://example.com/lacie
    # http://example.com/tillie

从文档中获取所有文字内容:

print(soup.get_text())
# The Dormouse's story
#
# The Dormouse's story
#
# Once upon a time there were three little sisters; and their names were
# Elsie,
# Lacie and
# Tillie;
# and they lived at the bottom of a well.
#
# ...

这是你想要的吗?别着急,还有更好用的

安装 Beautiful Soup

如果你用的是新版的Debain或ubuntu,那么可以通过系统的软件包管理来安装:

$ apt-get install Python-bs4

Beautiful Soup 4 通过PyPi发布,所以如果你无法使用系统包管理安装,那么也可以通过 easy_install 或 pip 来安装.包的名字是 beautifulsoup4 ,这个包兼容Python2和Python3.

$ easy_install beautifulsoup4

$ pip install beautifulsoup4

(在PyPi中还有一个名字是 BeautifulSoup 的包,但那可能不是你想要的,那是 Beautiful Soup3 的发布版本,因为很多项目还在使用BS3, 所以 BeautifulSoup 包依然有效.但是如果你在编写新项目,那么你应该安装的 beautifulsoup4 )

如果你没有安装 easy_install 或 pip ,那你也可以 下载BS4的源码 ,然后通过setup.py来安装.

$ Python setup.py install

如果上述安装方法都行不通,Beautiful Soup的发布协议允许你将BS4的代码打包在你的项目中,这样无须安装即可使用.

作者在Python2.7和Python3.2的版本下开发Beautiful Soup, 理论上Beautiful Soup应该在所有当前的Python版本中正常工作

安装完成后的问题

Beautiful Soup发布时打包成Python2版本的代码,在Python3环境下安装时,会自动转换成Python3的代码,如果没有一个安装的过程,那么代码就不会被转换.

如果代码抛出了 ImportError 的异常: “No module named HTMLParser”, 这是因为你在Python3版本中执行Python2版本的代码.

如果代码抛出了 ImportError 的异常: “No module named html.parser”, 这是因为你在Python2版本中执行Python3版本的代码.

如果遇到上述2种情况,最好的解决方法是重新安装BeautifulSoup4.

如果在ROOT_TAG_NAME = u’[document]’代码处遇到 SyntaxError “Invalid syntax”错误,需要将把BS4的Python代码版本从Python2转换到Python3. 可以重新安装BS4:

$ Python3 setup.py install

或在bs4的目录中执行Python代码版本转换脚本

$ 2to3-3.2 -w bs4

安装解析器

Beautiful Soup支持Python标准库中的HTML解析器,还支持一些第三方的解析器,其中一个是 lxml .根据操作系统不同,可以选择下列方法来安装lxml:

$ apt-get install Python-lxml

$ easy_install lxml

$ pip install lxml

另一个可供选择的解析器是纯Python实现的 html5lib , html5lib的解析方式与浏览器相同,可以选择下列方法来安装html5lib:

$ apt-get install Python-html5lib

$ easy_install html5lib

$ pip install html5lib

下表列出了主要的解析器,以及它们的优缺点:

解析器 使用方法 优势 劣势
Python标准库 BeautifulSoup(markup, "html.parser")
  • Python的内置标准库
  • 执行速度适中
  • 文档容错能力强
  • Python 2.7.3 or 3.2.2)前 的版本中文档容错能力差
lxml HTML 解析器 BeautifulSoup(markup, "lxml")
  • 速度快
  • 文档容错能力强
  • 需要安装C语言库
lxml XML 解析器

BeautifulSoup(markup, ["lxml", "xml"])

BeautifulSoup(markup, "xml")

  • 速度快
  • 唯一支持XML的解析器
  • 需要安装C语言库
html5lib BeautifulSoup(markup, "html5lib")
  • 最好的容错性
  • 以浏览器的方式解析文档
  • 生成HTML5格式的文档
  • 速度慢
  • 不依赖外部扩展

推荐使用lxml作为解析器,因为效率更高. 在Python2.7.3之前的版本和Python3中3.2.2之前的版本,必须安装lxml或html5lib, 因为那些Python版本的标准库中内置的HTML解析方法不够稳定.

提示: 如果一段HTML或XML文档格式不正确的话,那么在不同的解析器中返回的结果可能是不一样的,查看 解析器之间的区别 了解更多细节

如何使用

将一段文档传入BeautifulSoup 的构造方法,就能得到一个文档的对象, 可以传入一段字符串或一个文件句柄.

from bs4 import BeautifulSoup

soup = BeautifulSoup(open("index.html"))

soup = BeautifulSoup("<html>data</html>")

首先,文档被转换成Unicode,并且HTML的实例都被转换成Unicode编码

BeautifulSoup("Sacr&eacute; bleu!")
<html><head></head><body>Sacré bleu!</body></html>

然后,Beautiful Soup选择最合适的解析器来解析这段文档,如果手动指定解析器那么Beautiful Soup会选择指定的解析器来解析文档.(参考 解析成XML ).

对象的种类

Beautiful Soup将复杂HTML文档转换成一个复杂的树形结构,每个节点都是Python对象,所有对象可以归纳为4种: Tag , NavigableString , BeautifulSoup , Comment .

Tag

Tag 对象与XML或HTML原生文档中的tag相同:

soup = BeautifulSoup('<b class="boldest">Extremely bold</b>')
tag = soup.b
type(tag)
# <class 'bs4.element.Tag'>

Tag有很多方法和属性,在 遍历文档树 和 搜索文档树 中有详细解释.现在介绍一下tag中最重要的属性: name和attributes

Name

每个tag都有自己的名字,通过 .name 来获取:

tag.name
# u'b'

如果改变了tag的name,那将影响所有通过当前Beautiful Soup对象生成的HTML文档:

tag.name = "blockquote"
tag
# <blockquote class="boldest">Extremely bold</blockquote>

Attributes

一个tag可能有很多个属性. tag <b class="boldest"> 有一个 “class” 的属性,值为 “boldest” . tag的属性的操作方法与字典相同:

tag['class']
# u'boldest'

也可以直接”点”取属性, 比如: .attrs :

tag.attrs
# {u'class': u'boldest'}

tag的属性可以被添加,删除或修改. 再说一次, tag的属性操作方法与字典一样

tag['class'] = 'verybold'
tag['id'] = 1
tag
# <blockquote class="verybold" id="1">Extremely bold</blockquote>

del tag['class']
del tag['id']
tag
# <blockquote>Extremely bold</blockquote>

tag['class']
# KeyError: 'class'
print(tag.get('class'))
# None

多值属性

HTML 4定义了一系列可以包含多个值的属性.在HTML5中移除了一些,却增加更多.最常见的多值的属性是 class (一个tag可以有多个CSS的class). 还有一些属性 rel , rev , accept-charset , headers , accesskey . 在Beautiful Soup中多值属性的返回类型是list:

css_soup = BeautifulSoup('<p class="body strikeout"></p>')
css_soup.p['class']
# ["body", "strikeout"]

css_soup = BeautifulSoup('<p class="body"></p>')
css_soup.p['class']
# ["body"]

如果某个属性看起来好像有多个值,但在任何版本的HTML定义中都没有被定义为多值属性,那么Beautiful Soup会将这个属性作为字符串返回

id_soup = BeautifulSoup('<p id="my id"></p>')
id_soup.p['id']
# 'my id'

将tag转换成字符串时,多值属性会合并为一个值

rel_soup = BeautifulSoup('<p>Back to the <a rel="index">homepage</a></p>')
rel_soup.a['rel']
# ['index']
rel_soup.a['rel'] = ['index', 'contents']
print(rel_soup.p)
# <p>Back to the <a rel="index contents">homepage</a></p>

如果转换的文档是XML格式,那么tag中不包含多值属性

xml_soup = BeautifulSoup('<p class="body strikeout"></p>', 'xml')
xml_soup.p['class']
# u'body strikeout'

可以遍历的字符串

字符串常被包含在tag内.Beautiful Soup用 NavigableString 类来包装tag中的字符串:

tag.string
# u'Extremely bold'
type(tag.string)
# <class 'bs4.element.NavigableString'>

一个 NavigableString 字符串与Python中的Unicode字符串相同,并且还支持包含在 遍历文档树 和 搜索文档树 中的一些特性. 通过 unicode() 方法可以直接将 NavigableString 对象转换成Unicode字符串:

unicode_string = unicode(tag.string)
unicode_string
# u'Extremely bold'
type(unicode_string)
# <type 'unicode'>

tag中包含的字符串不能编辑,但是可以被替换成其它的字符串,用 replace_with() 方法:

tag.string.replace_with("No longer bold")
tag
# <blockquote>No longer bold</blockquote>

NavigableString 对象支持 遍历文档树 和 搜索文档树 中定义的大部分属性, 并非全部.尤其是,一个字符串不能包含其它内容(tag能够包含字符串或是其它tag),字符串不支持 .contents 或 .string 属性或 find() 方法.

如果想在Beautiful Soup之外使用 NavigableString 对象,需要调用 unicode() 方法,将该对象转换成普通的Unicode字符串,否则就算Beautiful Soup已方法已经执行结束,该对象的输出也会带有对象的引用地址.这样会浪费内存.

BeautifulSoup

BeautifulSoup 对象表示的是一个文档的全部内容.大部分时候,可以把它当作 Tag 对象,它支持 遍历文档树 和 搜索文档树 中描述的大部分的方法.

因为 BeautifulSoup 对象并不是真正的HTML或XML的tag,所以它没有name和attribute属性.但有时查看它的 .name 属性是很方便的,所以 BeautifulSoup 对象包含了一个值为 “[document]” 的特殊属性 .name

soup.name
# u'[document]'

注释及特殊字符串

Tag , NavigableString , BeautifulSoup 几乎覆盖了html和xml中的所有内容,但是还有一些特殊对象.容易让人担心的内容是文档的注释部分:

markup = "<b><!--Hey, buddy. Want to buy a used parser?--></b>"
soup = BeautifulSoup(markup)
comment = soup.b.string
type(comment)
# <class 'bs4.element.Comment'>

Comment 对象是一个特殊类型的 NavigableString 对象:

comment
# u'Hey, buddy. Want to buy a used parser'

但是当它出现在HTML文档中时, Comment 对象会使用特殊的格式输出:

print(soup.b.prettify())
# <b>
#  <!--Hey, buddy. Want to buy a used parser?-->
# </b>

Beautiful Soup中定义的其它类型都可能会出现在XML的文档中: CData , ProcessingInstruction , Declaration , Doctype .与 Comment 对象类似,这些类都是 NavigableString 的子类,只是添加了一些额外的方法的字符串独享.下面是用CDATA来替代注释的例子:

from bs4 import CData
cdata = CData("A CDATA block")
comment.replace_with(cdata)

print(soup.b.prettify())
# <b>
#  <![CDATA[A CDATA block]]>
# </b>

遍历文档树

还拿”爱丽丝梦游仙境”的文档来做例子:

html_doc = """
<html><head><title>The Dormouse's story</title></head>

<p class="title"><b>The Dormouse's story</b></p>

<p class="story">Once upon a time there were three little sisters; and their names were
<a href="http://example.com/elsie" class="sister" id="link1">Elsie</a>,
<a href="http://example.com/lacie" class="sister" id="link2">Lacie</a> and
<a href="http://example.com/tillie" class="sister" id="link3">Tillie</a>;
and they lived at the bottom of a well.</p>

<p class="story">...</p>
"""

from bs4 import BeautifulSoup
soup = BeautifulSoup(html_doc)

通过这段例子来演示怎样从文档的一段内容找到另一段内容

子节点

一个Tag可能包含多个字符串或其它的Tag,这些都是这个Tag的子节点.Beautiful Soup提供了许多操作和遍历子节点的属性.

注意: Beautiful Soup中字符串节点不支持这些属性,因为字符串没有子节点

tag的名字

操作文档树最简单的方法就是告诉它你想获取的tag的name.如果想获取 <head> 标签,只要用 soup.head :

soup.head
# <head><title>The Dormouse's story</title></head>

soup.title
# <title>The Dormouse's story</title>

这是个获取tag的小窍门,可以在文档树的tag中多次调用这个方法.下面的代码可以获取<body>标签中的第一个<b>标签:

soup.body.b
# <b>The Dormouse's story</b>

通过点取属性的方式只能获得当前名字的第一个tag:

soup.a
# <a class="sister" href="http://example.com/elsie" id="link1">Elsie</a>

如果想要得到所有的<a>标签,或是通过名字得到比一个tag更多的内容的时候,就需要用到 Searching the tree 中描述的方法,比如: find_all()

soup.find_all('a')
# [<a class="sister" href="http://example.com/elsie" id="link1">Elsie</a>,
#  <a class="sister" href="http://example.com/lacie" id="link2">Lacie</a>,
#  <a class="sister" href="http://example.com/tillie" id="link3">Tillie</a>]

.contents 和 .children

tag的 .contents 属性可以将tag的子节点以列表的方式输出:

head_tag = soup.head
head_tag
# <head><title>The Dormouse's story</title></head>

head_tag.contents
[<title>The Dormouse's story</title>]

title_tag = head_tag.contents[0]
title_tag
# <title>The Dormouse's story</title>
title_tag.contents
# [u'The Dormouse's story']

BeautifulSoup 对象本身一定会包含子节点,也就是说<html>标签也是 BeautifulSoup 对象的子节点:

len(soup.contents)
# 1
soup.contents[0].name
# u'html'

字符串没有 .contents 属性,因为字符串没有子节点:

text = title_tag.contents[0]
text.contents
# AttributeError: 'NavigableString' object has no attribute 'contents'

通过tag的 .children 生成器,可以对tag的子节点进行循环:

for child in title_tag.children:
    print(child)
    # The Dormouse's story

.descendants

.contents 和 .children 属性仅包含tag的直接子节点.例如,<head>标签只有一个直接子节点<title>

head_tag.contents
# [<title>The Dormouse's story</title>]

但是<title>标签也包含一个子节点:字符串 “The Dormouse’s story”,这种情况下字符串 “The Dormouse’s story”也属于<head>标签的子孙节点. .descendants 属性可以对所有tag的子孙节点进行递归循环 [5] :

for child in head_tag.descendants:
    print(child)
    # <title>The Dormouse's story</title>
    # The Dormouse's story

上面的例子中, <head>标签只有一个子节点,但是有2个子孙节点:<head>节点和<head>的子节点, BeautifulSoup 有一个直接子节点(<html>节点),却有很多子孙节点:

len(list(soup.children))
# 1
len(list(soup.descendants))
# 25

.string

如果tag只有一个 NavigableString 类型子节点,那么这个tag可以使用 .string 得到子节点:

title_tag.string
# u'The Dormouse's story'

如果一个tag仅有一个子节点,那么这个tag也可以使用 .string 方法,输出结果与当前唯一子节点的 .string 结果相同:

head_tag.contents
# [<title>The Dormouse's story</title>]

head_tag.string
# u'The Dormouse's story'

如果tag包含了多个子节点,tag就无法确定 .string 方法应该调用哪个子节点的内容, .string 的输出结果是 None :

print(soup.html.string)
# None

.strings 和 stripped_strings

如果tag中包含多个字符串 [2] ,可以使用 .strings 来循环获取:

for string in soup.strings:
    print(repr(string))
    # u"The Dormouse's story"
    # u'\n\n'
    # u"The Dormouse's story"
    # u'\n\n'
    # u'Once upon a time there were three little sisters; and their names were\n'
    # u'Elsie'
    # u',\n'
    # u'Lacie'
    # u' and\n'
    # u'Tillie'
    # u';\nand they lived at the bottom of a well.'
    # u'\n\n'
    # u'...'
    # u'\n'

输出的字符串中可能包含了很多空格或空行,使用 .stripped_strings 可以去除多余空白内容:

for string in soup.stripped_strings:
    print(repr(string))
    # u"The Dormouse's story"
    # u"The Dormouse's story"
    # u'Once upon a time there were three little sisters; and their names were'
    # u'Elsie'
    # u','
    # u'Lacie'
    # u'and'
    # u'Tillie'
    # u';\nand they lived at the bottom of a well.'
    # u'...'

全部是空格的行会被忽略掉,段首和段末的空白会被删除

父节点

继续分析文档树,每个tag或字符串都有父节点:被包含在某个tag中

.parent

通过 .parent 属性来获取某个元素的父节点.在例子“爱丽丝”的文档中,<head>标签是<title>标签的父节点:

title_tag = soup.title
title_tag
# <title>The Dormouse's story</title>
title_tag.parent
# <head><title>The Dormouse's story</title></head>

文档title的字符串也有父节点:<title>标签

title_tag.string.parent
# <title>The Dormouse's story</title>

文档的顶层节点比如<html>的父节点是 BeautifulSoup 对象:

html_tag = soup.html
type(html_tag.parent)
# <class 'bs4.BeautifulSoup'>

BeautifulSoup 对象的 .parent 是None:

print(soup.parent)
# None

.parents

通过元素的 .parents 属性可以递归得到元素的所有父辈节点,下面的例子使用了 .parents 方法遍历了<a>标签到根节点的所有节点.

link = soup.a
link
# <a class="sister" href="http://example.com/elsie" id="link1">Elsie</a>
for parent in link.parents:
    if parent is None:
        print(parent)
    else:
        print(parent.name)
# p
# body
# html
# [document]
# None

兄弟节点

看一段简单的例子:

sibling_soup = BeautifulSoup("<a><b>text1</b><c>text2</c></b></a>")
print(sibling_soup.prettify())
# <html>
#  <body>
#   <a>
#    <b>
#     text1
#    </b>
#    <c>
#     text2
#    </c>
#   </a>
#  </body>
# </html>

因为<b>标签和<c>标签是同一层:他们是同一个元素的子节点,所以<b>和<c>可以被称为兄弟节点.一段文档以标准格式输出时,兄弟节点有相同的缩进级别.在代码中也可以使用这种关系.

.next_sibling 和 .previous_sibling

在文档树中,使用 .next_sibling 和 .previous_sibling 属性来查询兄弟节点:

sibling_soup.b.next_sibling
# <c>text2</c>

sibling_soup.c.previous_sibling
# <b>text1</b>

<b>标签有 .next_sibling 属性,但是没有 .previous_sibling 属性,因为<b>标签在同级节点中是第一个.同理,<c>标签有 .previous_sibling 属性,却没有 .next_sibling 属性:

print(sibling_soup.b.previous_sibling)
# None
print(sibling_soup.c.next_sibling)
# None

例子中的字符串“text1”和“text2”不是兄弟节点,因为它们的父节点不同:

sibling_soup.b.string
# u'text1'

print(sibling_soup.b.string.next_sibling)
# None

实际文档中的tag的 .next_sibling 和 .previous_sibling 属性通常是字符串或空白. 看看“爱丽丝”文档:

<a href="http://example.com/elsie" class="sister" id="link1">Elsie</a>
<a href="http://example.com/lacie" class="sister" id="link2">Lacie</a>
<a href="http://example.com/tillie" class="sister" id="link3">Tillie</a>

如果以为第一个<a>标签的 .next_sibling 结果是第二个<a>标签,那就错了,真实结果是第一个<a>标签和第二个<a>标签之间的顿号和换行符:

link = soup.a
link
# <a class="sister" href="http://example.com/elsie" id="link1">Elsie</a>

link.next_sibling
# u',\n'

第二个<a>标签是顿号的 .next_sibling 属性:

link.next_sibling.next_sibling
# <a class="sister" href="http://example.com/lacie" id="link2">Lacie</a>

.next_siblings 和 .previous_siblings

通过 .next_siblings 和 .previous_siblings 属性可以对当前节点的兄弟节点迭代输出:

for sibling in soup.a.next_siblings:
    print(repr(sibling))
    # u',\n'
    # <a class="sister" href="http://example.com/lacie" id="link2">Lacie</a>
    # u' and\n'
    # <a class="sister" href="http://example.com/tillie" id="link3">Tillie</a>
    # u'; and they lived at the bottom of a well.'
    # None

for sibling in soup.find(id="link3").previous_siblings:
    print(repr(sibling))
    # ' and\n'
    # <a class="sister" href="http://example.com/lacie" id="link2">Lacie</a>
    # u',\n'
    # <a class="sister" href="http://example.com/elsie" id="link1">Elsie</a>
    # u'Once upon a time there were three little sisters; and their names were\n'
    # None

回退和前进

看一下“爱丽丝” 文档:

<html><head><title>The Dormouse's story</title></head>
<p class="title"><b>The Dormouse's story</b></p>

HTML解析器把这段字符串转换成一连串的事件: “打开<html>标签”,”打开一个<head>标签”,”打开一个<title>标签”,”添加一段字符串”,”关闭<title>标签”,”打开<p>标签”,等等.Beautiful Soup提供了重现解析器初始化过程的方法.

.next_element 和 .previous_element

.next_element 属性指向解析过程中下一个被解析的对象(字符串或tag),结果可能与 .next_sibling 相同,但通常是不一样的.

这是“爱丽丝”文档中最后一个<a>标签,它的 .next_sibling 结果是一个字符串,因为当前的解析过程 [2] 因为当前的解析过程因为遇到了<a>标签而中断了:

last_a_tag = soup.find("a", id="link3")
last_a_tag
# <a class="sister" href="http://example.com/tillie" id="link3">Tillie</a>

last_a_tag.next_sibling
# '; and they lived at the bottom of a well.'

但这个<a>标签的 .next_element 属性结果是在<a>标签被解析之后的解析内容,不是<a>标签后的句子部分,应该是字符串”Tillie”:

last_a_tag.next_element
# u'Tillie'

这是因为在原始文档中,字符串“Tillie” 在分号前出现,解析器先进入<a>标签,然后是字符串“Tillie”,然后关闭</a>标签,然后是分号和剩余部分.分号与<a>标签在同一层级,但是字符串“Tillie”会被先解析.

.previous_element 属性刚好与 .next_element 相反,它指向当前被解析的对象的前一个解析对象:

last_a_tag.previous_element
# u' and\n'
last_a_tag.previous_element.next_element
# <a class="sister" href="http://example.com/tillie" id="link3">Tillie</a>

.next_elements 和 .previous_elements

通过 .next_elements 和 .previous_elements 的迭代器就可以向前或向后访问文档的解析内容,就好像文档正在被解析一样:

for element in last_a_tag.next_elements:
    print(repr(element))
# u'Tillie'
# u';\nand they lived at the bottom of a well.'
# u'\n\n'
# <p class="story">...</p>
# u'...'
# u'\n'
# None

搜索文档树

Beautiful Soup定义了很多搜索方法,这里着重介绍2个: find() 和 find_all() .其它方法的参数和用法类似,请读者举一反三.

再以“爱丽丝”文档作为例子:

html_doc = """
<html><head><title>The Dormouse's story</title></head>

<p class="title"><b>The Dormouse's story</b></p>

<p class="story">Once upon a time there were three little sisters; and their names were
<a href="http://example.com/elsie" class="sister" id="link1">Elsie</a>,
<a href="http://example.com/lacie" class="sister" id="link2">Lacie</a> and
<a href="http://example.com/tillie" class="sister" id="link3">Tillie</a>;
and they lived at the bottom of a well.</p>

<p class="story">...</p>
"""

from bs4 import BeautifulSoup
soup = BeautifulSoup(html_doc)

使用 find_all() 类似的方法可以查找到想要查找的文档内容

过滤器

介绍 find_all() 方法前,先介绍一下过滤器的类型 [3] ,这些过滤器贯穿整个搜索的API.过滤器可以被用在tag的name中,节点的属性中,字符串中或他们的混合中.

字符串

最简单的过滤器是字符串.在搜索方法中传入一个字符串参数,Beautiful Soup会查找与字符串完整匹配的内容,下面的例子用于查找文档中所有的<b>标签:

soup.find_all('b')
# [<b>The Dormouse's story</b>]

如果传入字节码参数,Beautiful Soup会当作UTF-8编码,可以传入一段Unicode 编码来避免Beautiful Soup解析编码出错

正则表达式

如果传入正则表达式作为参数,Beautiful Soup会通过正则表达式的 match() 来匹配内容.下面例子中找出所有以b开头的标签,这表示<body>和<b>标签都应该被找到:

import re
for tag in soup.find_all(re.compile("^b")):
    print(tag.name)
# body
# b

下面代码找出所有名字中包含”t”的标签:

for tag in soup.find_all(re.compile("t")):
    print(tag.name)
# html
# title

列表

如果传入列表参数,Beautiful Soup会将与列表中任一元素匹配的内容返回.下面代码找到文档中所有<a>标签和<b>标签:

soup.find_all(["a", "b"])
# [<b>The Dormouse's story</b>,
#  <a class="sister" href="http://example.com/elsie" id="link1">Elsie</a>,
#  <a class="sister" href="http://example.com/lacie" id="link2">Lacie</a>,
#  <a class="sister" href="http://example.com/tillie" id="link3">Tillie</a>]

True

True 可以匹配任何值,下面代码查找到所有的tag,但是不会返回字符串节点

for tag in soup.find_all(True):
    print(tag.name)
# html
# head
# title
# body
# p
# b
# p
# a
# a
# a
# p

方法

如果没有合适过滤器,那么还可以定义一个方法,方法只接受一个元素参数 [4] ,如果这个方法返回 True 表示当前元素匹配并且被找到,如果不是则反回 False

下面方法校验了当前元素,如果包含 class 属性却不包含 id 属性,那么将返回 True:

def has_class_but_no_id(tag):
    return tag.has_attr('class') and not tag.has_attr('id')

将这个方法作为参数传入 find_all() 方法,将得到所有<p>标签:

soup.find_all(has_class_but_no_id)
# [<p class="title"><b>The Dormouse's story</b></p>,
#  <p class="story">Once upon a time there were...</p>,
#  <p class="story">...</p>]

返回结果中只有<p>标签没有<a>标签,因为<a>标签还定义了”id”,没有返回<html>和<head>,因为<html>和<head>中没有定义”class”属性.

下面代码找到所有被文字包含的节点内容:

from bs4 import NavigableString
def surrounded_by_strings(tag):
    return (isinstance(tag.next_element, NavigableString)
            and isinstance(tag.previous_element, NavigableString))

for tag in soup.find_all(surrounded_by_strings):
    print tag.name
# p
# a
# a
# a
# p

现在来了解一下搜索方法的细节

find_all()

find_all( name , attrs , recursive , text , **kwargs )

find_all() 方法搜索当前tag的所有tag子节点,并判断是否符合过滤器的条件.这里有几个例子:

soup.find_all("title")
# [<title>The Dormouse's story</title>]

soup.find_all("p", "title")
# [<p class="title"><b>The Dormouse's story</b></p>]

soup.find_all("a")
# [<a class="sister" href="http://example.com/elsie" id="link1">Elsie</a>,
#  <a class="sister" href="http://example.com/lacie" id="link2">Lacie</a>,
#  <a class="sister" href="http://example.com/tillie" id="link3">Tillie</a>]

soup.find_all(id="link2")
# [<a class="sister" href="http://example.com/lacie" id="link2">Lacie</a>]

import re
soup.find(text=re.compile("sisters"))
# u'Once upon a time there were three little sisters; and their names were\n'

有几个方法很相似,还有几个方法是新的,参数中的 text 和 id 是什么含义? 为什么 find_all("p", "title") 返回的是CSS Class为”title”的<p>标签? 我们来仔细看一下 find_all() 的参数

name 参数

name 参数可以查找所有名字为 name 的tag,字符串对象会被自动忽略掉.

简单的用法如下:

soup.find_all("title")
# [<title>The Dormouse's story</title>]

重申: 搜索 name 参数的值可以使任一类型的 过滤器 ,字符窜,正则表达式,列表,方法或是 True .

keyword 参数

如果一个指定名字的参数不是搜索内置的参数名,搜索时会把该参数当作指定名字tag的属性来搜索,如果包含一个名字为 id 的参数,Beautiful Soup会搜索每个tag的”id”属性.

soup.find_all(id='link2')
# [<a class="sister" href="http://example.com/lacie" id="link2">Lacie</a>]

如果传入 href 参数,Beautiful Soup会搜索每个tag的”href”属性:

soup.find_all(href=re.compile("elsie"))
# [<a class="sister" href="http://example.com/elsie" id="link1">Elsie</a>]

搜索指定名字的属性时可以使用的参数值包括 字符串 , 正则表达式 , 列表True .

下面的例子在文档树中查找所有包含 id 属性的tag,无论 id 的值是什么:

soup.find_all(id=True)
# [<a class="sister" href="http://example.com/elsie" id="link1">Elsie</a>,
#  <a class="sister" href="http://example.com/lacie" id="link2">Lacie</a>,
#  <a class="sister" href="http://example.com/tillie" id="link3">Tillie</a>]

使用多个指定名字的参数可以同时过滤tag的多个属性:

soup.find_all(href=re.compile("elsie"), id='link1')
# [<a class="sister" href="http://example.com/elsie" id="link1">three</a>]

有些tag属性在搜索不能使用,比如HTML5中的 data-* 属性:

data_soup = BeautifulSoup('<div data-foo="value">foo!</div>')
data_soup.find_all(data-foo="value")
# SyntaxError: keyword can't be an expression

但是可以通过 find_all() 方法的 attrs 参数定义一个字典参数来搜索包含特殊属性的tag:

data_soup.find_all(attrs={"data-foo": "value"})
# [<div data-foo="value">foo!</div>]

按CSS搜索

按照CSS类名搜索tag的功能非常实用,但标识CSS类名的关键字 class 在Python中是保留字,使用 class 做参数会导致语法错误.从Beautiful Soup的4.1.1版本开始,可以通过 class_ 参数搜索有指定CSS类名的tag:

soup.find_all("a", class_="sister")
# [<a class="sister" href="http://example.com/elsie" id="link1">Elsie</a>,
#  <a class="sister" href="http://example.com/lacie" id="link2">Lacie</a>,
#  <a class="sister" href="http://example.com/tillie" id="link3">Tillie</a>]

class_ 参数同样接受不同类型的 过滤器 ,字符串,正则表达式,方法或 True :

soup.find_all(class_=re.compile("itl"))
# [<p class="title"><b>The Dormouse's story</b></p>]

def has_six_characters(css_class):
    return css_class is not None and len(css_class) == 6

soup.find_all(class_=has_six_characters)
# [<a class="sister" href="http://example.com/elsie" id="link1">Elsie</a>,
#  <a class="sister" href="http://example.com/lacie" id="link2">Lacie</a>,
#  <a class="sister" href="http://example.com/tillie" id="link3">Tillie</a>]

tag的 class 属性是 多值属性 .按照CSS类名搜索tag时,可以分别搜索tag中的每个CSS类名:

css_soup = BeautifulSoup('<p class="body strikeout"></p>')
css_soup.find_all("p", class_="strikeout")
# [<p class="body strikeout"></p>]

css_soup.find_all("p", class_="body")
# [<p class="body strikeout"></p>]

搜索 class 属性时也可以通过CSS值完全匹配:

css_soup.find_all("p", class_="body strikeout")
# [<p class="body strikeout"></p>]

完全匹配 class 的值时,如果CSS类名的顺序与实际不符,将搜索不到结果:

soup.find_all("a", attrs={"class": "sister"})
# [<a class="sister" href="http://example.com/elsie" id="link1">Elsie</a>,
#  <a class="sister" href="http://example.com/lacie" id="link2">Lacie</a>,
#  <a class="sister" href="http://example.com/tillie" id="link3">Tillie</a>]

text 参数

通过 text 参数可以搜搜文档中的字符串内容.与 name 参数的可选值一样, text 参数接受 字符串 , 正则表达式 , 列表True . 看例子:

soup.find_all(text="Elsie")
# [u'Elsie']

soup.find_all(text=["Tillie", "Elsie", "Lacie"])
# [u'Elsie', u'Lacie', u'Tillie']

soup.find_all(text=re.compile("Dormouse"))
[u"The Dormouse's story", u"The Dormouse's story"]

def is_the_only_string_within_a_tag(s):
    ""Return True if this string is the only child of its parent tag.""
    return (s == s.parent.string)

soup.find_all(text=is_the_only_string_within_a_tag)
# [u"The Dormouse's story", u"The Dormouse's story", u'Elsie', u'Lacie', u'Tillie', u'...']

虽然 text 参数用于搜索字符串,还可以与其它参数混合使用来过滤tag.Beautiful Soup会找到 .string 方法与 text 参数值相符的tag.下面代码用来搜索内容里面包含“Elsie”的<a>标签:

soup.find_all("a", text="Elsie")
# [<a href="http://example.com/elsie" class="sister" id="link1">Elsie</a>]

limit 参数

find_all() 方法返回全部的搜索结构,如果文档树很大那么搜索会很慢.如果我们不需要全部结果,可以使用 limit 参数限制返回结果的数量.效果与SQL中的limit关键字类似,当搜索到的结果数量达到 limit 的限制时,就停止搜索返回结果.

文档树中有3个tag符合搜索条件,但结果只返回了2个,因为我们限制了返回数量:

soup.find_all("a", limit=2)
# [<a class="sister" href="http://example.com/elsie" id="link1">Elsie</a>,
#  <a class="sister" href="http://example.com/lacie" id="link2">Lacie</a>]

recursive 参数

调用tag的 find_all() 方法时,Beautiful Soup会检索当前tag的所有子孙节点,如果只想搜索tag的直接子节点,可以使用参数 recursive=False .

一段简单的文档:

<html>
 <head>
  <title>
   The Dormouse's story
  </title>
 </head>
...

是否使用 recursive 参数的搜索结果:

soup.html.find_all("title")
# [<title>The Dormouse's story</title>]

soup.html.find_all("title", recursive=False)
# []

像调用 find_all() 一样调用tag

find_all() 几乎是Beautiful Soup中最常用的搜索方法,所以我们定义了它的简写方法. BeautifulSoup 对象和 tag 对象可以被当作一个方法来使用,这个方法的执行结果与调用这个对象的 find_all() 方法相同,下面两行代码是等价的:

soup.find_all("a")
soup("a")

这两行代码也是等价的:

soup.title.find_all(text=True)
soup.title(text=True)

find()

find( name , attrs , recursive , text , **kwargs )

find_all() 方法将返回文档中符合条件的所有tag,尽管有时候我们只想得到一个结果.比如文档中只有一个<body>标签,那么使用 find_all() 方法来查找<body>标签就不太合适, 使用 find_all 方法并设置 limit=1 参数不如直接使用 find() 方法.下面两行代码是等价的:

soup.find_all('title', limit=1)
# [<title>The Dormouse's story</title>]

soup.find('title')
# <title>The Dormouse's story</title>

唯一的区别是 find_all() 方法的返回结果是值包含一个元素的列表,而 find() 方法直接返回结果.

find_all() 方法没有找到目标是返回空列表, find() 方法找不到目标时,返回 None .

print(soup.find("nosuchtag"))
# None

soup.head.title 是 tag的名字 方法的简写.这个简写的原理就是多次调用当前tag的 find() 方法:

soup.head.title
# <title>The Dormouse's story</title>

soup.find("head").find("title")
# <title>The Dormouse's story</title>

find_parents() 和 find_parent()

find_parents( name , attrs , recursive , text , **kwargs )

find_parent( name , attrs , recursive , text , **kwargs )

我们已经用了很大篇幅来介绍 find_all() 和 find() 方法,Beautiful Soup中还有10个用于搜索的API.它们中的五个用的是与 find_all() 相同的搜索参数,另外5个与 find() 方法的搜索参数类似.区别仅是它们搜索文档的不同部分.

记住: find_all() 和 find() 只搜索当前节点的所有子节点,孙子节点等. find_parents() 和 find_parent() 用来搜索当前节点的父辈节点,搜索方法与普通tag的搜索方法相同,搜索文档搜索文档包含的内容. 我们从一个文档中的一个叶子节点开始:

a_string = soup.find(text="Lacie")
a_string
# u'Lacie'

a_string.find_parents("a")
# [<a class="sister" href="http://example.com/lacie" id="link2">Lacie</a>]

a_string.find_parent("p")
# <p class="story">Once upon a time there were three little sisters; and their names were
#  <a class="sister" href="http://example.com/elsie" id="link1">Elsie</a>,
#  <a class="sister" href="http://example.com/lacie" id="link2">Lacie</a> and
#  <a class="sister" href="http://example.com/tillie" id="link3">Tillie</a>;
#  and they lived at the bottom of a well.</p>

a_string.find_parents("p", class="title")
# []

文档中的一个<a>标签是是当前叶子节点的直接父节点,所以可以被找到.还有一个<p>标签,是目标叶子节点的间接父辈节点,所以也可以被找到.包含class值为”title”的<p>标签不是不是目标叶子节点的父辈节点,所以通过 find_parents() 方法搜索不到.

find_parent() 和 find_parents() 方法会让人联想到 .parent 和 .parents 属性.它们之间的联系非常紧密.搜索父辈节点的方法实际上就是对 .parents 属性的迭代搜索.

find_next_siblings() 合 find_next_sibling()

find_next_siblings( name , attrs , recursive , text , **kwargs )

find_next_sibling( name , attrs , recursive , text , **kwargs )

这2个方法通过 .next_siblings 属性对当tag的所有后面解析 [5] 的兄弟tag节点进行迭代, find_next_siblings() 方法返回所有符合条件的后面的兄弟节点, find_next_sibling() 只返回符合条件的后面的第一个tag节点.

first_link = soup.a
first_link
# <a class="sister" href="http://example.com/elsie" id="link1">Elsie</a>

first_link.find_next_siblings("a")
# [<a class="sister" href="http://example.com/lacie" id="link2">Lacie</a>,
#  <a class="sister" href="http://example.com/tillie" id="link3">Tillie</a>]

first_story_paragraph = soup.find("p", "story")
first_story_paragraph.find_next_sibling("p")
# <p class="story">...</p>

find_previous_siblings() 和 find_previous_sibling()

find_previous_siblings( name , attrs , recursive , text , **kwargs )

find_previous_sibling( name , attrs , recursive , text , **kwargs )

这2个方法通过 .previous_siblings 属性对当前tag的前面解析 [5] 的兄弟tag节点进行迭代, find_previous_siblings() 方法返回所有符合条件的前面的兄弟节点, find_previous_sibling() 方法返回第一个符合条件的前面的兄弟节点:

last_link = soup.find("a", id="link3")
last_link
# <a class="sister" href="http://example.com/tillie" id="link3">Tillie</a>

last_link.find_previous_siblings("a")
# [<a class="sister" href="http://example.com/lacie" id="link2">Lacie</a>,
#  <a class="sister" href="http://example.com/elsie" id="link1">Elsie</a>]

first_story_paragraph = soup.find("p", "story")
first_story_paragraph.find_previous_sibling("p")
# <p class="title"><b>The Dormouse's story</b></p>

find_all_next() 和 find_next()

find_all_next( name , attrs , recursive , text , **kwargs )

find_next( name , attrs , recursive , text , **kwargs )

这2个方法通过 .next_elements 属性对当前tag的之后的 [5] tag和字符串进行迭代, find_all_next() 方法返回所有符合条件的节点, find_next() 方法返回第一个符合条件的节点:

first_link = soup.a
first_link
# <a class="sister" href="http://example.com/elsie" id="link1">Elsie</a>

first_link.find_all_next(text=True)
# [u'Elsie', u',\n', u'Lacie', u' and\n', u'Tillie',
#  u';\nand they lived at the bottom of a well.', u'\n\n', u'...', u'\n']

first_link.find_next("p")
# <p class="story">...</p>

第一个例子中,字符串 “Elsie”也被显示出来,尽管它被包含在我们开始查找的<a>标签的里面.第二个例子中,最后一个<p>标签也被显示出来,尽管它与我们开始查找位置的<a>标签不属于同一部分.例子中,搜索的重点是要匹配过滤器的条件,并且在文档中出现的顺序而不是开始查找的元素的位置.

find_all_previous() 和 find_previous()

find_all_previous( name , attrs , recursive , text , **kwargs )

find_previous( name , attrs , recursive , text , **kwargs )

这2个方法通过 .previous_elements 属性对当前节点前面 [5] 的tag和字符串进行迭代, find_all_previous() 方法返回所有符合条件的节点, find_previous() 方法返回第一个符合条件的节点.

first_link = soup.a
first_link
# <a class="sister" href="http://example.com/elsie" id="link1">Elsie</a>

first_link.find_all_previous("p")
# [<p class="story">Once upon a time there were three little sisters; ...</p>,
#  <p class="title"><b>The Dormouse's story</b></p>]

first_link.find_previous("title")
# <title>The Dormouse's story</title>

find_all_previous("p") 返回了文档中的第一段(class=”title”的那段),但还返回了第二段,<p>标签包含了我们开始查找的<a>标签.不要惊讶,这段代码的功能是查找所有出现在指定<a>标签之前的<p>标签,因为这个<p>标签包含了开始的<a>标签,所以<p>标签一定是在<a>之前出现的.

CSS选择器

Beautiful Soup支持大部分的CSS选择器 [6] ,在 Tag 或 BeautifulSoup 对象的 .select() 方法中传入字符串参数,即可使用CSS选择器的语法找到tag:

soup.select("title")
# [<title>The Dormouse's story</title>]

soup.select("p nth-of-type(3)")
# [<p class="story">...</p>]

通过tag标签逐层查找:

soup.select("body a")
# [<a class="sister" href="http://example.com/elsie" id="link1">Elsie</a>,
#  <a class="sister" href="http://example.com/lacie"  id="link2">Lacie</a>,
#  <a class="sister" href="http://example.com/tillie" id="link3">Tillie</a>]

soup.select("html head title")
# [<title>The Dormouse's story</title>]

找到某个tag标签下的直接子标签 [6] :

soup.select("head > title")
# [<title>The Dormouse's story</title>]

soup.select("p > a")
# [<a class="sister" href="http://example.com/elsie" id="link1">Elsie</a>,
#  <a class="sister" href="http://example.com/lacie"  id="link2">Lacie</a>,
#  <a class="sister" href="http://example.com/tillie" id="link3">Tillie</a>]

soup.select("p > a:nth-of-type(2)")
# [<a class="sister" href="http://example.com/lacie" id="link2">Lacie</a>]

soup.select("p > #link1")
# [<a class="sister" href="http://example.com/elsie" id="link1">Elsie</a>]

soup.select("body > a")
# []

找到兄弟节点标签:

soup.select("#link1 ~ .sister")
# [<a class="sister" href="http://example.com/lacie" id="link2">Lacie</a>,
#  <a class="sister" href="http://example.com/tillie"  id="link3">Tillie</a>]

soup.select("#link1 + .sister")
# [<a class="sister" href="http://example.com/lacie" id="link2">Lacie</a>]

通过CSS的类名查找:

soup.select(".sister")
# [<a class="sister" href="http://example.com/elsie" id="link1">Elsie</a>,
#  <a class="sister" href="http://example.com/lacie" id="link2">Lacie</a>,
#  <a class="sister" href="http://example.com/tillie" id="link3">Tillie</a>]

soup.select("[class~=sister]")
# [<a class="sister" href="http://example.com/elsie" id="link1">Elsie</a>,
#  <a class="sister" href="http://example.com/lacie" id="link2">Lacie</a>,
#  <a class="sister" href="http://example.com/tillie" id="link3">Tillie</a>]

通过tag的id查找:

soup.select("#link1")
# [<a class="sister" href="http://example.com/elsie" id="link1">Elsie</a>]

soup.select("a#link2")
# [<a class="sister" href="http://example.com/lacie" id="link2">Lacie</a>]

通过是否存在某个属性来查找:

soup.select('a[href]')
# [<a class="sister" href="http://example.com/elsie" id="link1">Elsie</a>,
#  <a class="sister" href="http://example.com/lacie" id="link2">Lacie</a>,
#  <a class="sister" href="http://example.com/tillie" id="link3">Tillie</a>]

通过属性的值来查找:

soup.select('a[href="http://example.com/elsie"]')
# [<a class="sister" href="http://example.com/elsie" id="link1">Elsie</a>]

soup.select('a[href^="http://example.com/"]')
# [<a class="sister" href="http://example.com/elsie" id="link1">Elsie</a>,
#  <a class="sister" href="http://example.com/lacie" id="link2">Lacie</a>,
#  <a class="sister" href="http://example.com/tillie" id="link3">Tillie</a>]

soup.select('a[href$="tillie"]')
# [<a class="sister" href="http://example.com/tillie" id="link3">Tillie</a>]

soup.select('a[href*=".com/el"]')
# [<a class="sister" href="http://example.com/elsie" id="link1">Elsie</a>]

通过语言设置来查找:

multilingual_markup = """
 <p lang="en">Hello</p>
 <p lang="en-us">Howdy, y'all</p>
 <p lang="en-gb">Pip-pip, old fruit</p>
 <p lang="fr">Bonjour mes amis</p>
"""
multilingual_soup = BeautifulSoup(multilingual_markup)
multilingual_soup.select('p[lang|=en]')
# [<p lang="en">Hello</p>,
#  <p lang="en-us">Howdy, y'all</p>,
#  <p lang="en-gb">Pip-pip, old fruit</p>]

对于熟悉CSS选择器语法的人来说这是个非常方便的方法.Beautiful Soup也支持CSS选择器API,如果你仅仅需要CSS选择器的功能,那么直接使用 lxml 也可以,而且速度更快,支持更多的CSS选择器语法,但Beautiful Soup整合了CSS选择器的语法和自身方便使用API.

修改文档树

Beautiful Soup的强项是文档树的搜索,但同时也可以方便的修改文档树

修改tag的名称和属性

在 Attributes 的章节中已经介绍过这个功能,但是再看一遍也无妨. 重命名一个tag,改变属性的值,添加或删除属性:

soup = BeautifulSoup('<b class="boldest">Extremely bold</b>')
tag = soup.b

tag.name = "blockquote"
tag['class'] = 'verybold'
tag['id'] = 1
tag
# <blockquote class="verybold" id="1">Extremely bold</blockquote>

del tag['class']
del tag['id']
tag
# <blockquote>Extremely bold</blockquote>

修改 .string

给tag的 .string 属性赋值,就相当于用当前的内容替代了原来的内容:

markup = '<a href="http://example.com/">I linked to <i>example.com</i></a>'
soup = BeautifulSoup(markup)

tag = soup.a
tag.string = "New link text."
tag
# <a href="http://example.com/">New link text.</a>

注意: 如果当前的tag包含了其它tag,那么给它的 .string 属性赋值会覆盖掉原有的所有内容包括子tag

append()

Tag.append() 方法想tag中添加内容,就好像Python的列表的 .append() 方法:

soup = BeautifulSoup("<a>Foo</a>")
soup.a.append("Bar")

soup
# <html><head></head><body><a>FooBar</a></body></html>
soup.a.contents
# [u'Foo', u'Bar']

BeautifulSoup.new_string() 和 .new_tag()

如果想添加一段文本内容到文档中也没问题,可以调用Python的 append() 方法或调用工厂方法 BeautifulSoup.new_string() :

soup = BeautifulSoup("<b></b>")
tag = soup.b
tag.append("Hello")
new_string = soup.new_string(" there")
tag.append(new_string)
tag
# <b>Hello there.</b>
tag.contents
# [u'Hello', u' there']

如果想要创建一段注释,或 NavigableString 的任何子类,将子类作为 new_string() 方法的第二个参数传入:

from bs4 import Comment
new_comment = soup.new_string("Nice to see you.", Comment)
tag.append(new_comment)
tag
# <b>Hello there<!--Nice to see you.--></b>
tag.contents
# [u'Hello', u' there', u'Nice to see you.']

# 这是Beautiful Soup 4.2.1 中新增的方法

创建一个tag最好的方法是调用工厂方法 BeautifulSoup.new_tag() :

soup = BeautifulSoup("<b></b>")
original_tag = soup.b

new_tag = soup.new_tag("a", href="http://www.example.com")
original_tag.append(new_tag)
original_tag
# <b><a href="http://www.example.com"></a></b>

new_tag.string = "Link text."
original_tag
# <b><a href="http://www.example.com">Link text.</a></b>

第一个参数作为tag的name,是必填,其它参数选填

insert()

Tag.insert() 方法与 Tag.append() 方法类似,区别是不会把新元素添加到父节点 .contents 属性的最后,而是把元素插入到指定的位置.与Python列表总的 .insert() 方法的用法下同:

markup = '<a href="http://example.com/">I linked to <i>example.com</i></a>'
soup = BeautifulSoup(markup)
tag = soup.a

tag.insert(1, "but did not endorse ")
tag
# <a href="http://example.com/">I linked to but did not endorse <i>example.com</i></a>
tag.contents
# [u'I linked to ', u'but did not endorse', <i>example.com</i>]

insert_before() 和 insert_after()

insert_before() 方法在当前tag或文本节点前插入内容:

soup = BeautifulSoup("<b>stop</b>")
tag = soup.new_tag("i")
tag.string = "Don't"
soup.b.string.insert_before(tag)
soup.b
# <b><i>Don't</i>stop</b>

insert_after() 方法在当前tag或文本节点后插入内容:

soup.b.i.insert_after(soup.new_string(" ever "))
soup.b
# <b><i>Don't</i> ever stop</b>
soup.b.contents
# [<i>Don't</i>, u' ever ', u'stop']

clear()

Tag.clear() 方法移除当前tag的内容:

markup = '<a href="http://example.com/">I linked to <i>example.com</i></a>'
soup = BeautifulSoup(markup)
tag = soup.a

tag.clear()
tag
# <a href="http://example.com/"></a>

extract()

PageElement.extract() 方法将当前tag移除文档树,并作为方法结果返回:

markup = '<a href="http://example.com/">I linked to <i>example.com</i></a>'
soup = BeautifulSoup(markup)
a_tag = soup.a

i_tag = soup.i.extract()

a_tag
# <a href="http://example.com/">I linked to</a>

i_tag
# <i>example.com</i>

print(i_tag.parent)
None

这个方法实际上产生了2个文档树: 一个是用来解析原始文档的 BeautifulSoup 对象,另一个是被移除并且返回的tag.被移除并返回的tag可以继续调用 extract 方法:

my_string = i_tag.string.extract()
my_string
# u'example.com'

print(my_string.parent)
# None
i_tag
# <i></i>

decompose()

Tag.decompose() 方法将当前节点移除文档树并完全销毁:

markup = '<a href="http://example.com/">I linked to <i>example.com</i></a>'
soup = BeautifulSoup(markup)
a_tag = soup.a

soup.i.decompose()

a_tag
# <a href="http://example.com/">I linked to</a>

replace_with()

PageElement.replace_with() 方法移除文档树中的某段内容,并用新tag或文本节点替代它:

markup = '<a href="http://example.com/">I linked to <i>example.com</i></a>'
soup = BeautifulSoup(markup)
a_tag = soup.a

new_tag = soup.new_tag("b")
new_tag.string = "example.net"
a_tag.i.replace_with(new_tag)

a_tag
# <a href="http://example.com/">I linked to <b>example.net</b></a>

replace_with() 方法返回被替代的tag或文本节点,可以用来浏览或添加到文档树其它地方

wrap()

PageElement.wrap() 方法可以对指定的tag元素进行包装 [8] ,并返回包装后的结果:

soup = BeautifulSoup("<p>I wish I was bold.</p>")
soup.p.string.wrap(soup.new_tag("b"))
# <b>I wish I was bold.</b>

soup.p.wrap(soup.new_tag("div"))
# <div><p><b>I wish I was bold.</b></p></div>

该方法在 Beautiful Soup 4.0.5 中添加

unwrap()

Tag.unwrap() 方法与 wrap() 方法相反.将移除tag内的所有tag标签,该方法常被用来进行标记的解包:

markup = '<a href="http://example.com/">I linked to <i>example.com</i></a>'
soup = BeautifulSoup(markup)
a_tag = soup.a

a_tag.i.unwrap()
a_tag
# <a href="http://example.com/">I linked to example.com</a>

与 replace_with() 方法相同, unwrap() 方法返回被移除的tag

输出

格式化输出

prettify() 方法将Beautiful Soup的文档树格式化后以Unicode编码输出,每个XML/HTML标签都独占一行

markup = '<a href="http://example.com/">I linked to <i>example.com</i></a>'
soup = BeautifulSoup(markup)
soup.prettify()
# '<html>\n <head>\n </head>\n <body>\n  <a href="http://example.com/">\n...'

print(soup.prettify())
# <html>
#  <head>
#  </head>
#  <body>
#   <a href="http://example.com/">
#    I linked to
#    <i>
#     example.com
#    </i>
#   </a>
#  </body>
# </html>

BeautifulSoup 对象和它的tag节点都可以调用 prettify() 方法:

print(soup.a.prettify())
# <a href="http://example.com/">
#  I linked to
#  <i>
#   example.com
#  </i>
# </a>

压缩输出

如果只想得到结果字符串,不重视格式,那么可以对一个 BeautifulSoup 对象或 Tag 对象使用Python的 unicode() 或 str() 方法:

str(soup)
# '<html><head></head><body><a href="http://example.com/">I linked to <i>example.com</i></a></body></html>'

unicode(soup.a)
# u'<a href="http://example.com/">I linked to <i>example.com</i></a>'

str() 方法返回UTF-8编码的字符串,可以指定 编码 的设置.

还可以调用 encode() 方法获得字节码或调用 decode() 方法获得Unicode.

输出格式

Beautiful Soup输出是会将HTML中的特殊字符转换成Unicode,比如“&lquot;”:

soup = BeautifulSoup("&ldquo;Dammit!&rdquo; he said.")
unicode(soup)
# u'<html><head></head><body>\u201cDammit!\u201d he said.</body></html>'

如果将文档转换成字符串,Unicode编码会被编码成UTF-8.这样就无法正确显示HTML特殊字符了:

str(soup)
# '<html><head></head><body>\xe2\x80\x9cDammit!\xe2\x80\x9d he said.</body></html>'

get_text()

如果只想得到tag中包含的文本内容,那么可以嗲用 get_text() 方法,这个方法获取到tag中包含的所有文版内容包括子孙tag中的内容,并将结果作为Unicode字符串返回:

markup = '<a href="http://example.com/">\nI linked to <i>example.com</i>\n</a>'
soup = BeautifulSoup(markup)

soup.get_text()
u'\nI linked to example.com\n'
soup.i.get_text()
u'example.com'

可以通过参数指定tag的文本内容的分隔符:

# soup.get_text("|")
u'\nI linked to |example.com|\n'

还可以去除获得文本内容的前后空白:

# soup.get_text("|", strip=True)
u'I linked to|example.com'

或者使用 .stripped_strings 生成器,获得文本列表后手动处理列表:

[text for text in soup.stripped_strings]
# [u'I linked to', u'example.com']

指定文档解析器

如果仅是想要解析HTML文档,只要用文档创建 BeautifulSoup 对象就可以了.Beautiful Soup会自动选择一个解析器来解析文档.但是还可以通过参数指定使用那种解析器来解析当前文档.

BeautifulSoup 第一个参数应该是要被解析的文档字符串或是文件句柄,第二个参数用来标识怎样解析文档.如果第二个参数为空,那么Beautiful Soup根据当前系统安装的库自动选择解析器,解析器的优先数序: lxml, html5lib, Python标准库.在下面两种条件下解析器优先顺序会变化:

  • 要解析的文档是什么类型: 目前支持, “html”, “xml”, 和 “html5”
  • 指定使用哪种解析器: 目前支持, “lxml”, “html5lib”, 和 “html.parser”

安装解析器 章节介绍了可以使用哪种解析器,以及如何安装.

如果指定的解析器没有安装,Beautiful Soup会自动选择其它方案.目前只有 lxml 解析器支持XML文档的解析,在没有安装lxml库的情况下,创建 beautifulsoup 对象时无论是否指定使用lxml,都无法得到解析后的对象

解析器之间的区别

Beautiful Soup为不同的解析器提供了相同的接口,但解析器本身时有区别的.同一篇文档被不同的解析器解析后可能会生成不同结构的树型文档.区别最大的是HTML解析器和XML解析器,看下面片段被解析成HTML结构:

BeautifulSoup("<a><b /></a>")
# <html><head></head><body><a><b></b></a></body></html>

因为空标签<b />不符合HTML标准,所以解析器把它解析成<b></b>

同样的文档使用XML解析如下(解析XML需要安装lxml库).注意,空标签<b />依然被保留,并且文档前添加了XML头,而不是被包含在<html>标签内:

BeautifulSoup("<a><b /></a>", "xml")
# <?xml version="1.0" encoding="utf-8"?>
# <a><b/></a>

HTML解析器之间也有区别,如果被解析的HTML文档是标准格式,那么解析器之间没有任何差别,只是解析速度不同,结果都会返回正确的文档树.

但是如果被解析文档不是标准格式,那么不同的解析器返回结果可能不同.下面例子中,使用lxml解析错误格式的文档,结果</p>标签被直接忽略掉了:

BeautifulSoup("<a></p>", "lxml")
# <html><body><a></a></body></html>

使用html5lib库解析相同文档会得到不同的结果:

BeautifulSoup("<a></p>", "html5lib")
# <html><head></head><body><a><p></p></a></body></html>

html5lib库没有忽略掉</p>标签,而是自动补全了标签,还给文档树添加了<head>标签.

使用pyhton内置库解析结果如下:

BeautifulSoup("<a></p>", "html.parser")
# <a></a>

与lxml [7] 库类似的,Python内置库忽略掉了</p>标签,与html5lib库不同的是标准库没有尝试创建符合标准的文档格式或将文档片段包含在<body>标签内,与lxml不同的是标准库甚至连<html>标签都没有尝试去添加.

因为文档片段“<a></p>”是错误格式,所以以上解析方式都能算作”正确”,html5lib库使用的是HTML5的部分标准,所以最接近”正确”.不过所有解析器的结构都能够被认为是”正常”的.

不同的解析器可能影响代码执行结果,如果在分发给别人的代码中使用了 BeautifulSoup ,那么最好注明使用了哪种解析器,以减少不必要的麻烦.

编码

任何HTML或XML文档都有自己的编码方式,比如ASCII 或 UTF-8,但是使用Beautiful Soup解析后,文档都被转换成了Unicode:

markup = "<h1>Sacr\xc3\xa9 bleu!</h1>"
soup = BeautifulSoup(markup)
soup.h1
# <h1>Sacré bleu!</h1>
soup.h1.string
# u'Sacr\xe9 bleu!'

这不是魔术(但很神奇),Beautiful Soup用了 编码自动检测 子库来识别当前文档编码并转换成Unicode编码. BeautifulSoup 对象的 .original_encoding 属性记录了自动识别编码的结果:

soup.original_encoding
'utf-8'

编码自动检测 功能大部分时候都能猜对编码格式,但有时候也会出错.有时候即使猜测正确,也是在逐个字节的遍历整个文档后才猜对的,这样很慢.如果预先知道文档编码,可以设置编码参数来减少自动检查编码出错的概率并且提高文档解析速度.在创建 BeautifulSoup 对象的时候设置 from_encoding 参数.

下面一段文档用了ISO-8859-8编码方式,这段文档太短,结果Beautiful Soup以为文档是用ISO-8859-7编码:

markup = b"<h1>\xed\xe5\xec\xf9</h1>"
soup = BeautifulSoup(markup)
soup.h1
<h1>νεμω</h1>
soup.original_encoding
'ISO-8859-7'

通过传入 from_encoding 参数来指定编码方式:

soup = BeautifulSoup(markup, from_encoding="iso-8859-8")
soup.h1
<h1>םולש</h1>
soup.original_encoding
'iso8859-8'

少数情况下(通常是UTF-8编码的文档中包含了其它编码格式的文件),想获得正确的Unicode编码就不得不将文档中少数特殊编码字符替换成特殊Unicode编码,“REPLACEMENT CHARACTER” (U+FFFD, �) [9] . 如果Beautifu Soup猜测文档编码时作了特殊字符的替换,那么Beautiful Soup会把 UnicodeDammit 或 BeautifulSoup 对象的 .contains_replacement_characters 属性标记为 True .这样就可以知道当前文档进行Unicode编码后丢失了一部分特殊内容字符.如果文档中包含�而 .contains_replacement_characters 属性是 False ,则表示�就是文档中原来的字符,不是转码失败.

输出编码

通过Beautiful Soup输出文档时,不管输入文档是什么编码方式,输出编码均为UTF-8编码,下面例子输入文档是Latin-1编码:

markup = b'''
<html>
  <head>
    <meta content="text/html; charset=ISO-Latin-1" http-equiv="Content-type" />
  </head>
  <body>
    <p>Sacr\xe9 bleu!</p>
  </body>
</html>
'''

soup = BeautifulSoup(markup)
print(soup.prettify())
# <html>
#  <head>
#   <meta content="text/html; charset=utf-8" http-equiv="Content-type" />
#  </head>
#  <body>
#   <p>
#    Sacré bleu!
#   </p>
#  </body>
# </html>

注意,输出文档中的<meta>标签的编码设置已经修改成了与输出编码一致的UTF-8.

如果不想用UTF-8编码输出,可以将编码方式传入 prettify() 方法:

print(soup.prettify("latin-1"))
# <html>
#  <head>
#   <meta content="text/html; charset=latin-1" http-equiv="Content-type" />
# ...

还可以调用 BeautifulSoup 对象或任意节点的 encode() 方法,就像Python的字符串调用 encode() 方法一样:

soup.p.encode("latin-1")
# '<p>Sacr\xe9 bleu!</p>'

soup.p.encode("utf-8")
# '<p>Sacr\xc3\xa9 bleu!</p>'

如果文档中包含当前编码不支持的字符,那么这些字符将呗转换成一系列XML特殊字符引用,下面例子中包含了Unicode编码字符SNOWMAN:

markup = u"<b>\N{SNOWMAN}</b>"
snowman_soup = BeautifulSoup(markup)
tag = snowman_soup.b

SNOWMAN字符在UTF-8编码中可以正常显示(看上去像是☃),但有些编码不支持SNOWMAN字符,比如ISO-Latin-1或ASCII,那么在这些编码中SNOWMAN字符会被转换成“&#9731”:

print(tag.encode("utf-8"))
# <b>☃</b>

print tag.encode("latin-1")
# <b>&#9731;</b>

print tag.encode("ascii")
# <b>&#9731;</b>

Unicode, dammit! (靠!)

编码自动检测 功能可以在Beautiful Soup以外使用,检测某段未知编码时,可以使用这个方法:

from bs4 import UnicodeDammit
dammit = UnicodeDammit("Sacr\xc3\xa9 bleu!")
print(dammit.unicode_markup)
# Sacré bleu!
dammit.original_encoding
# 'utf-8'

如果Python中安装了 chardet 或 cchardet 那么编码检测功能的准确率将大大提高.输入的字符越多,检测结果越精确,如果事先猜测到一些可能编码,那么可以将猜测的编码作为参数,这样将优先检测这些编码:

dammit = UnicodeDammit("Sacr\xe9 bleu!", ["latin-1", "iso-8859-1"])
print(dammit.unicode_markup)
# Sacré bleu!
dammit.original_encoding
# 'latin-1'

编码自动检测 功能中有2项功能是Beautiful Soup库中用不到的

智能引号

使用Unicode时,Beautiful Soup还会智能的把引号 [10] 转换成HTML或XML中的特殊字符:

markup = b"<p>I just \x93love\x94 Microsoft Word\x92s smart quotes</p>"

UnicodeDammit(markup, ["windows-1252"], smart_quotes_to="html").unicode_markup
# u'<p>I just &ldquo;love&rdquo; Microsoft Word&rsquo;s smart quotes</p>'

UnicodeDammit(markup, ["windows-1252"], smart_quotes_to="xml").unicode_markup
# u'<p>I just &#x201C;love&#x201D; Microsoft Word&#x2019;s smart quotes</p>'

也可以把引号转换为ASCII码:

UnicodeDammit(markup, ["windows-1252"], smart_quotes_to="ascii").unicode_markup
# u'<p>I just "love" Microsoft Word\'s smart quotes</p>'

很有用的功能,但是Beautiful Soup没有使用这种方式.默认情况下,Beautiful Soup把引号转换成Unicode:

UnicodeDammit(markup, ["windows-1252"]).unicode_markup
# u'<p>I just \u201clove\u201d Microsoft Word\u2019s smart quotes</p>'

矛盾的编码

有时文档的大部分都是用UTF-8,但同时还包含了Windows-1252编码的字符,就像微软的智能引号 [10] 一样.一些包含多个信息的来源网站容易出现这种情况. UnicodeDammit.detwingle() 方法可以把这类文档转换成纯UTF-8编码格式,看个简单的例子:

snowmen = (u"\N{SNOWMAN}" * 3)
quote = (u"\N{LEFT DOUBLE QUOTATION MARK}I like snowmen!\N{RIGHT DOUBLE QUOTATION MARK}")
doc = snowmen.encode("utf8") + quote.encode("windows_1252")

这段文档很杂乱,snowmen是UTF-8编码,引号是Windows-1252编码,直接输出时不能同时显示snowmen和引号,因为它们编码不同:

print(doc)
# ☃☃☃�I like snowmen!�

print(doc.decode("windows-1252"))
# ☃☃☃“I like snowmen!”

如果对这段文档用UTF-8解码就会得到 UnicodeDecodeError 异常,如果用Windows-1252解码就回得到一堆乱码.幸好, UnicodeDammit.detwingle() 方法会吧这段字符串转换成UTF-8编码,允许我们同时显示出文档中的snowmen和引号:

new_doc = UnicodeDammit.detwingle(doc)
print(new_doc.decode("utf8"))
# ☃☃☃“I like snowmen!”

UnicodeDammit.detwingle() 方法只能解码包含在UTF-8编码中的Windows-1252编码内容,但这解决了最常见的一类问题.

在创建 BeautifulSoup 或 UnicodeDammit 对象前一定要先对文档调用 UnicodeDammit.detwingle() 确保文档的编码方式正确.如果尝试去解析一段包含Windows-1252编码的UTF-8文档,就会得到一堆乱码,比如: ☃☃☃“I like snowmen!”.

UnicodeDammit.detwingle() 方法在Beautiful Soup 4.1.0版本中新增

解析部分文档

如果仅仅因为想要查找文档中的<a>标签而将整片文档进行解析,实在是浪费内存和时间.最快的方法是从一开始就把<a>标签以外的东西都忽略掉. SoupStrainer 类可以定义文档的某段内容,这样搜索文档时就不必先解析整篇文档,只会解析在 SoupStrainer 中定义过的文档. 创建一个 SoupStrainer 对象并作为 parse_only 参数给 BeautifulSoup 的构造方法即可.

SoupStrainer

SoupStrainer 类接受与典型搜索方法相同的参数:name , attrs , recursive , text , **kwargs 。下面举例说明三种 SoupStrainer 对象:

from bs4 import SoupStrainer

only_a_tags = SoupStrainer("a")

only_tags_with_id_link2 = SoupStrainer(id="link2")

def is_short_string(string):
    return len(string) < 10

only_short_strings = SoupStrainer(text=is_short_string)

再拿“爱丽丝”文档来举例,来看看使用三种 SoupStrainer 对象做参数会有什么不同:

html_doc = """
<html><head><title>The Dormouse's story</title></head>

<p class="title"><b>The Dormouse's story</b></p>

<p class="story">Once upon a time there were three little sisters; and their names were
<a href="http://example.com/elsie" class="sister" id="link1">Elsie</a>,
<a href="http://example.com/lacie" class="sister" id="link2">Lacie</a> and
<a href="http://example.com/tillie" class="sister" id="link3">Tillie</a>;
and they lived at the bottom of a well.</p>

<p class="story">...</p>
"""

print(BeautifulSoup(html_doc, "html.parser", parse_only=only_a_tags).prettify())
# <a class="sister" href="http://example.com/elsie" id="link1">
#  Elsie
# </a>
# <a class="sister" href="http://example.com/lacie" id="link2">
#  Lacie
# </a>
# <a class="sister" href="http://example.com/tillie" id="link3">
#  Tillie
# </a>

print(BeautifulSoup(html_doc, "html.parser", parse_only=only_tags_with_id_link2).prettify())
# <a class="sister" href="http://example.com/lacie" id="link2">
#  Lacie
# </a>

print(BeautifulSoup(html_doc, "html.parser", parse_only=only_short_strings).prettify())
# Elsie
# ,
# Lacie
# and
# Tillie
# ...
#

还可以将 SoupStrainer 作为参数传入 搜索文档树 中提到的方法.这可能不是个常用用法,所以还是提一下:

soup = BeautifulSoup(html_doc)
soup.find_all(only_short_strings)
# [u'\n\n', u'\n\n', u'Elsie', u',\n', u'Lacie', u' and\n', u'Tillie',
#  u'\n\n', u'...', u'\n']

常见问题

代码诊断

如果想知道Beautiful Soup到底怎样处理一份文档,可以将文档传入 diagnose() 方法(Beautiful Soup 4.2.0中新增),Beautiful Soup会输出一份报告,说明不同的解析器会怎样处理这段文档,并标出当前的解析过程会使用哪种解析器:

from bs4.diagnose import diagnose
data = open("bad.html").read()
diagnose(data)

# Diagnostic running on Beautiful Soup 4.2.0
# Python version 2.7.3 (default, Aug  1 2012, 05:16:07)
# I noticed that html5lib is not installed. Installing it may help.
# Found lxml version 2.3.2.0
#
# Trying to parse your data with html.parser
# Here's what html.parser did with the document:
# ...

diagnose() 方法的输出结果可能帮助你找到问题的原因,如果不行,还可以把结果复制出来以便寻求他人的帮助

文档解析错误

文档解析错误有两种.一种是崩溃,Beautiful Soup尝试解析一段文档结果却抛除了异常,通常是 HTMLParser.HTMLParseError .还有一种异常情况,是Beautiful Soup解析后的文档树看起来与原来的内容相差很多.

这些错误几乎都不是Beautiful Soup的原因,这不会是因为Beautiful Soup得代码写的太优秀,而是因为Beautiful Soup没有包含任何文档解析代码.异常产生自被依赖的解析器,如果解析器不能很好的解析出当前的文档,那么最好的办法是换一个解析器.更多细节查看 安装解析器 章节.

最常见的解析错误是 HTMLParser.HTMLParseError: malformed start tag 和 HTMLParser.HTMLParseError: bad end tag .这都是由Python内置的解析器引起的,解决方法是 安装lxml或html5lib

最常见的异常现象是当前文档找不到指定的Tag,而这个Tag光是用眼睛就足够发现的了. find_all() 方法返回 [] ,而 find() 方法返回 None .这是Python内置解析器的又一个问题: 解析器会跳过那些它不知道的tag.解决方法还是 安装lxml或html5lib

版本错误

  • SyntaxError: Invalid syntax (异常位置在代码行: ROOT_TAG_NAME = u'[document]' ),因为Python2版本的代码没有经过迁移就在Python3中窒息感
  • ImportError: No module named HTMLParser 因为在Python3中执行Python2版本的Beautiful Soup
  • ImportError: No module named html.parser 因为在Python2中执行Python3版本的Beautiful Soup
  • ImportError: No module named BeautifulSoup 因为在没有安装BeautifulSoup3库的Python环境下执行代码,或忘记了BeautifulSoup4的代码需要从 bs4 包中引入
  • ImportError: No module named bs4 因为当前Python环境下还没有安装BeautifulSoup4

解析成XML

默认情况下,Beautiful Soup会将当前文档作为HTML格式解析,如果要解析XML文档,要在 BeautifulSoup 构造方法中加入第二个参数 “xml”:

soup = BeautifulSoup(markup, "xml")

当然,还需要 安装lxml

解析器的错误

  • 如果同样的代码在不同环境下结果不同,可能是因为两个环境下使用不同的解析器造成的.例如这个环境中安装了lxml,而另一个环境中只有html5lib, 解析器之间的区别 中说明了原因.修复方法是在 BeautifulSoup 的构造方法中中指定解析器
  • 因为HTML标签是 大小写敏感 的,所以3种解析器再出来文档时都将tag和属性转换成小写.例如文档中的 <TAG></TAG> 会被转换为 <tag></tag> .如果想要保留tag的大写的话,那么应该将文档 解析成XML .

杂项错误

  • UnicodeEncodeError: 'charmap' codec can't encode character u'\xfoo' in position bar (或其它类型的 UnicodeEncodeError )的错误,主要是两方面的错误(都不是Beautiful Soup的原因),第一种是正在使用的终端(console)无法显示部分Unicode,参考 Python wiki ,第二种是向文件写入时,被写入文件不支持部分Unicode,这时只要用 u.encode("utf8") 方法将编码转换为UTF-8.
  • KeyError: [attr] 因为调用 tag['attr'] 方法而引起,因为这个tag没有定义该属性.出错最多的是 KeyError: 'href' 和 KeyError: 'class' .如果不确定某个属性是否存在时,用 tag.get('attr') 方法去获取它,跟获取Python字典的key一样
  • AttributeError: 'ResultSet' object has no attribute 'foo' 错误通常是因为把 find_all() 的返回结果当作一个tag或文本节点使用,实际上返回结果是一个列表或 ResultSet 对象的字符串,需要对结果进行循环才能得到每个节点的 .foo 属性.或者使用 find() 方法仅获取到一个节点
  • AttributeError: 'NoneType' object has no attribute 'foo' 这个错误通常是在调用了 find() 方法后直节点取某个属性 .foo 但是 find() 方法并没有找到任何结果,所以它的返回值是 None .需要找出为什么 find() 的返回值是 None .

如何提高效率

Beautiful Soup对文档的解析速度不会比它所依赖的解析器更快,如果对计算时间要求很高或者计算机的时间比程序员的时间更值钱,那么就应该直接使用 lxml .

换句话说,还有提高Beautiful Soup效率的办法,使用lxml作为解析器.Beautiful Soup用lxml做解析器比用html5lib或Python内置解析器速度快很多.

安装 cchardet 后文档的解码的编码检测会速度更快

解析部分文档 不会节省多少解析时间,但是会节省很多内存,并且搜索时也会变得更快.

Beautiful Soup 3

Beautiful Soup 3是上一个发布版本,目前已经停止维护.Beautiful Soup 3库目前已经被几个主要的linux平台添加到源里:

$ apt-get install Python-beautifulsoup

在PyPi中分发的包名字是 BeautifulSoup :

$ easy_install BeautifulSoup

$ pip install BeautifulSoup

或通过 Beautiful Soup 3.2.0源码包 安装

Beautiful Soup 3的在线文档查看 这里 ,当然还有 中文版 ,然后再读本片文档,来对比Beautiful Soup 4中有什新变化.

迁移到BS4

只要一个小变动就能让大部分的Beautiful Soup 3代码使用Beautiful Soup 4的库和方法—-修改 BeautifulSoup 对象的引入方式:

from BeautifulSoup import BeautifulSoup

修改为:

from bs4 import BeautifulSoup
  • 如果代码抛出 ImportError 异常“No module named BeautifulSoup”,原因可能是尝试执行Beautiful Soup 3,但环境中只安装了Beautiful Soup 4库
  • 如果代码跑出 ImportError 异常“No module named bs4”,原因可能是尝试运行Beautiful Soup 4的代码,但环境中只安装了Beautiful Soup 3.

虽然BS4兼容绝大部分BS3的功能,但BS3中的大部分方法已经不推荐使用了,就方法按照 PEP8标准 重新定义了方法名.很多方法都重新定义了方法名,但只有少数几个方法没有向下兼容.

上述内容就是BS3迁移到BS4的注意事项

需要的解析器

Beautiful Soup 3曾使用Python的 SGMLParser 解析器,这个模块在Python3中已经被移除了.Beautiful Soup 4默认使用系统的 html.parser ,也可以使用lxml或html5lib扩展库代替.查看 安装解析器 章节

因为 html.parser 解析器与 SGMLParser 解析器不同,它们在处理格式不正确的文档时也会产生不同结果.通常 html.parser 解析器会抛出异常.所以推荐安装扩展库作为解析器.有时 html.parser 解析出的文档树结构与 SGMLParser 的不同.如果发生这种情况,那么需要升级BS3来处理新的文档树.

方法名的变化

  • renderContents -> encode_contents
  • replaceWith -> replace_with
  • replaceWithChildren -> unwrap
  • findAll -> find_all
  • findAllNext -> find_all_next
  • findAllPrevious -> find_all_previous
  • findNext -> find_next
  • findNextSibling -> find_next_sibling
  • findNextSiblings -> find_next_siblings
  • findParent -> find_parent
  • findParents -> find_parents
  • findPrevious -> find_previous
  • findPreviousSibling -> find_previous_sibling
  • findPreviousSiblings -> find_previous_siblings
  • nextSibling -> next_sibling
  • previousSibling -> previous_sibling

Beautiful Soup构造方法的参数部分也有名字变化:

  • BeautifulSoup(parseOnlyThese=...) -> BeautifulSoup(parse_only=...)
  • BeautifulSoup(fromEncoding=...) -> BeautifulSoup(from_encoding=...)

为了适配Python3,修改了一个方法名:

  • Tag.has_key() -> Tag.has_attr()

修改了一个属性名,让它看起来更专业点:

  • Tag.isSelfClosing -> Tag.is_empty_element

修改了下面3个属性的名字,以免雨Python保留字冲突.这些变动不是向下兼容的,如果在BS3中使用了这些属性,那么在BS4中这些代码无法执行.

  • UnicodeDammit.Unicode -> UnicodeDammit.Unicode_markup“
  • Tag.next -> Tag.next_element
  • Tag.previous -> Tag.previous_element

生成器

将下列生成器按照PEP8标准重新命名,并转换成对象的属性:

  • childGenerator() -> children
  • nextGenerator() -> next_elements
  • nextSiblingGenerator() -> next_siblings
  • previousGenerator() -> previous_elements
  • previousSiblingGenerator() -> previous_siblings
  • recursiveChildGenerator() -> descendants
  • parentGenerator() -> parents

所以迁移到BS4版本时要替换这些代码:

for parent in tag.parentGenerator():
    ...

替换为:

for parent in tag.parents:
    ...

(两种调用方法现在都能使用)

BS3中有的生成器循环结束后会返回 None 然后结束.这是个bug.新版生成器不再返回 None .

BS4中增加了2个新的生成器, .strings 和 stripped_strings . .strings 生成器返回NavigableString对象, .stripped_strings 方法返回去除前后空白的Python的string对象.

XML

BS4中移除了解析XML的 BeautifulStoneSoup 类.如果要解析一段XML文档,使用 BeautifulSoup 构造方法并在第二个参数设置为“xml”.同时 BeautifulSoup 构造方法也不再识别 isHTML 参数.

Beautiful Soup处理XML空标签的方法升级了.旧版本中解析XML时必须指明哪个标签是空标签. 构造方法的 selfClosingTags 参数已经不再使用.新版Beautiful Soup将所有空标签解析为空元素,如果向空元素中添加子节点,那么这个元素就不再是空元素了.

实体

HTML或XML实体都会被解析成Unicode字符,Beautiful Soup 3版本中有很多处理实体的方法,在新版中都被移除了. BeautifulSoup 构造方法也不再接受 smartQuotesTo 或 convertEntities 参数. 编码自动检测 方法依然有 smart_quotes_to 参数,但是默认会将引号转换成Unicode.内容配置项 HTML_ENTITIES , XML_ENTITIES 和 XHTML_ENTITIES 在新版中被移除.因为它们代表的特性已经不再被支持.

如果在输出文档时想把Unicode字符转换成HTML实体,而不是输出成UTF-8编码,那就需要用到 输出格式 的方法.

迁移杂项

Tag.string 属性现在是一个递归操作.如果A标签只包含了一个B标签,那么A标签的.string属性值与B标签的.string属性值相同.

多值属性 比如 class 属性包含一个他们的值的列表,而不是一个字符串.这可能会影响到如何按照CSS类名哦搜索tag.

如果使用 find* 方法时同时传入了 text 参数 和 name 参数 .Beautiful Soup会搜索指定name的tag,并且这个tag的 Tag.string 属性包含text参数的内容.结果中不会包含字符串本身.旧版本中Beautiful Soup会忽略掉tag参数,只搜索text参数.

BeautifulSoup 构造方法不再支持 markupMassage 参数.现在由解析器负责文档的解析正确性.

很少被用到的几个解析器方法在新版中被移除,比如 ICantBelieveItsBeautifulSoup 和 BeautifulSOAP .现在由解析器完全负责如何解释模糊不清的文档标记.

prettify() 方法在新版中返回Unicode字符串,不再返回字节流.

BeautifulSoup3 文档

[1] BeautifulSoup的google讨论组不是很活跃,可能是因为库已经比较完善了吧,但是作者还是会很热心的尽量帮你解决问题的.
[2] (12) 文档被解析成树形结构,所以下一步解析过程应该是当前节点的子节点
[3] 过滤器只能作为搜索文档的参数,或者说应该叫参数类型更为贴切,原文中用了 filter 因此翻译为过滤器
[4] 元素参数,HTML文档中的一个tag节点,不能是文本节点
[5] (12345) 采用先序遍历方式
[6] (12) CSS选择器是一种单独的文档搜索语法, 参考 http://www.w3school.com.cn/css/css_selector_type.asp
[7] 原文写的是 html5lib, 译者觉得这是愿文档的一个笔误
[8] wrap含有包装,打包的意思,但是这里的包装不是在外部包装而是将当前tag的内部内容包装在一个tag里.包装原来内容的新tag依然在执行 wrap() 方法的tag内
[9] 文档中特殊编码字符被替换成特殊字符(通常是�)的过程是Beautful Soup自动实现的,如果想要多种编码格式的文档被完全转换正确,那么,只好,预先手动处理,统一编码格式
[10] (12) 智能引号,常出现在microsoft的word软件中,即在某一段落中按引号出现的顺序每个引号都被自动转换为左引号,或右引号.

Table Of Contents

This Page

JUPYTER NOTEBOOK 中更换主题与折叠代码

得益于良好的交互性和简洁的界面, Deep Learning 或 Python 编程中经常使用 Jupyter Notebook 作为一个快速实现的环境。
Jupyter Notebook 的默认界面比较简朴,但其基于 Web 技术开发的特性让定制、修改界面变得不那么困难。
不过,直接操作如在 CSS 文件上修改,对不熟悉 web 开发的调包/调参侠们来说依然是个艰巨的任务。好在 Python 是个开放的社区,已经有人开发了一些应用,安装之后只需几条命令就可以实现上面的功能。下面就分别介绍两组插件:jupyterthemes 和 jupyter_contrib_nbextensions。

使用 JUPYTERTHEMES 定制界面

效果如图:

这里写图片描述

这里写图片描述

这里写图片描述

这些看起来非常酷炫的效果是 jupyterthemes 插件实现的:https://github.com/dunovank/jupyter-themes

安装插件需要:

  • Python 2.7, 3.4, 3.5, 3.6
  • Jupyter (Anaconda recommended)
  • matplotlib

安装非常简单:

# 安装 jupyterthemes
pip install jupyterthemes

# 升级到最新版本
pip install --upgrade jupyterthemes

安装完成后,jupyterthemes 以别名 jt 存在于 python 环境中。
有时页面 https://github.com/dunovank/jupyter-themes 上显示的主题可能已经不支持了,所以更换主题前首先

jt -l
  • 1

查看当前支持的主题。
比如我想换 grade3,那么输入

jt -t -grade3
  • 1

就把主题换掉了。不过默认字体都特别难看,所以需要指定字体。可以对照示例选择顺眼的字体:
https://github.com/dunovank/jupyter-themes#command-line-examples

其他的设置比较琐碎就不再赘述了,github 页面上给出了详细的说明。

代码折叠

Jupyter Notebook 另一个不太舒服的地方就是默认没有代码折叠功能。手动修改比较麻烦,所以也有人把功能集成到一部分插件里,可以直接在 notebook 界面上点击选项来设置。
插件安装和启用:

pip install jupyter_contrib_nbextensions
jupyter contrib nbextension install --user
pip install jupyter_nbextensions_configurator
jupyter nbextensions_configurator enable --user

其中 jupyter_contrib_nbextensions 是功能集成插件,nbextensions_configurator 让用户可以直接在 notebook 界面中修改这些选项。
成功配置的话,启动 notebook 会看到点开 Nbextensions 的选项,并勾选

Hinterland

发现可选内容很多,这里我们只需要折叠代码的功能,所以直接在

Collapsible Headings 勾选就可以了。其他功能可以自己慢慢尝试。

二、Anaconda3 安装 爬虫库 selenium(windows环境)

Anaconda3 安装 爬虫库 selenium(windows环境)

一、Anaconda 安装selenium库
#使用命令:conda或pip
conda install selenium

pip install selenium

#用 Chrome 浏览器来测试

from selenium import webdriver

browser = webdriver.Chrome()
browser.get(‘http://www.baidu.com/’)

运行这段代码,会自动打开浏览器,然后访问百度。
如果程序执行错误,浏览器没有打开,那么应该是没有装 Chrome 浏览器或者 Chrome 驱动没有配置在环境变量里。接步骤二。

二、配置ChromeDriver
ChromeDriver下载
下载地址:
http://npm.taobao.org/mirrors/chromedriver/(可用)

chromedriver的版本要与你使用的chrome版本(下载地址中选择对应的chrome浏览器)对应:

查看chrome版本:
查看chrome浏览器版本

ChromeDriver存放路径
将chromedriver.exe放置在anaconda安装路径下的Scripts目录下,例如:F:\Anaconda\Scripts

三、测试selenium库是否安装成功

获取chrome浏览器版本信息
selenium 安装与 chromedriver安装
在windows+anaconda3环境下安装selenium

selenium安装
11-17
开源自动化测试工具selenium的使用教程
anaconda安装selenium
HappyCharlotte的博客
241
参考网址为https://blog.csdn.net/demon119/article/details/107041096/

通过anaconda中的QT console执行pip install selenium 下载Chrome版本对应的chromedriver, Chrome的chromedriver下载是通过chromedriver mirror,要注意下载Mac64_m1版本,具体网址为https://chromedriver.chromium.org/downloads 以及https://c

直接放在谷歌浏览器根目录,不放在\Anaconda\Scripts可以使用
————————————————

selenium库(一):在windows+anaconda3环境下安装selenium

一、安装selenium
使用命令行命令:conda或pip
+ conda install selenium
+ pip install selenium

二、下载Drivers
1.selenium需要驱动程序与所选的浏览器进行交互,例如安装了Chrome浏览器就需要下ChromeDriver

2.不同浏览器的下载地址

浏览器 驱动下载地址
Chrome https://sites.google.com/a/chromium.org/chromedriver/downloads
Edge https://developer.microsoft.com/en-us/microsoft-edge/tools/webdriver/
Firefox https://github.com/mozilla/geckodriver/releases
Safari https://webkit.org/blog/6900/webdriver-support-in-safari-10/
3.驱动程序的存放路径

以Chrome为例,将chromedriver.exe放置在anaconda安装路径下的Scripts目录下,例如:D:\Anaconda3\Scripts

三、检验是否安装成功
如果下面的代码运行后能打开浏览器,证明安装成功

from selenium import webdriver
from selenium.webdriver.common.keys import Keys
driver = webdriver.Chrome()

四、可能遇到的问题
1.安装完selenium后,matplotlib无法使用,使用pip/conda uninstall matplotlib卸载后在重新安装matplotlib

2.chromedriver.exe的版本应该与Chrome浏览器的版本相一致。在浏览器中输入chrome://version/可以查看浏览器版本,以下是版本对应关系

ChromeDriver v2.40 (2018-06-07)———-Supports Chrome v66-68
ChromeDriver v2.39 (2018-05-30)———-Supports Chrome v66-68
ChromeDriver v2.38 (2018-04-17)———-Supports Chrome v65-67
ChromeDriver v2.37 (2018-03-16)———-Supports Chrome v64-66
ChromeDriver v2.36 (2018-03-02)———-Supports Chrome v63-65
ChromeDriver v2.35 (2018-01-10)———-Supports Chrome v62-64
————————————————
版权声明:本文为CSDN博主「BQW_」的原创文章,遵循CC 4.0 BY-SA版权协议,转载请附上原文出处链接及本声明。
原文链接:https://blog.csdn.net/bqw18744018044/article/details/81300709

一、python3 爬虫环境搭建之 Anaconda 和 Scrapy

一、python3 爬虫环境搭建之 Anaconda 和 Scrapy

supercrys

于 2018-04-27 21:33:04 发布

11590
收藏 11
分类专栏: python3 爬虫 文章标签: Anaconda Scrapy Windows10 conda install -c conda-forge s
版权

python3 爬虫
专栏收录该内容
4 篇文章0 订阅
订阅专栏
python3 只是爬虫开发的编程语言,开发爬虫还需要很多其他环境,比如 IDE 工具,常用库等等. 根据我的使用体验,推荐如下环境搭建步骤,桌面环境为 Windows 10.


安装 Anaconda
Anaconda 是一个集成度很高的基于 python 的数据科学平台,无论在开发爬虫还是机器学习等方面,都游刃有余. Anaconda 包含 250 多个数据科学包和自带的包管理工具 conda,一行命令就可以轻松安装绝大部分依赖库, 比如 Scikit-Learn, Scipy, Tensorflow 等.

Anaconda 的下载地址

安装这个软件跟着提示走就可以,唯一要注意的地方就是软件的安装目录最好是英文的,并且不能有空格. 安装好后找到如下图所示三个图标.


比较常用的就是这三个应用了, Anaconda 在安装好后已经为我们配好了自己的系统环境和 python3 的环境,通常安装依赖的话只需要在命令行终端 Anaconda Prompt 直接执行 conda 命令就好.

比如,可以使用下面的命令查看当前配置的环境路径:

>conda env list
# conda environments:
#
base * D:\ProgramFiles\Anaconda
使用下面的命令查看不同路径下的 python:

>where python
D:\ProgramFiles\Anaconda\python.exe
查看当前使用的 python 的版本信息:

>python –version
Python 3.6.3 :: Anaconda custom (64-bit)
查看当前环境下已经安装好的包:

>conda list
# packages in environment at D:\ProgramFiles\Anaconda:
#
# Name Version Build Channel
_ipyw_jlab_nb_ext_conf 0.1.0 py36he6757f0_0
alabaster 0.7.10 py36hcd07829_0
anaconda custom py36h363777c_0
anaconda-client 1.6.14 py36_0
anaconda-navigator 1.8.3 py36_0
anaconda-project 0.8.0 py36h8b3bf89_0
asn1crypto 0.22.0 py36h8e79faa_1
astroid 1.5.3 py36h9d85297_0
astropy 2.0.2 py36h06391c4_4
babel 2.5.0 py36h35444c1_0
backports 1.0 py36h81696a8_1
backports.shutil_get_terminal_size 1.0.0 py36h79ab834_2
beautifulsoup4 4.6.0 py36hd4cc5e8_1
bitarray 0.8.1 py36h6af124b_0
bkcharts 0.2 py36h7e685f7_0
blaze 0.11.3 py36h8a29ca5_0
bleach 2.0.0 py36h0a7e3d6_0
bokeh 0.12.10 py36h0be3b39_0
boto 2.48.0 py36h1a776d2_1
bottleneck 1.2.1 py36hd119dfa_0
bzip2 1.0.6 vc14hdec8e7a_1 [vc14]
ca-certificates 2017.08.26 h94faf87_0
cachecontrol 0.12.3 py36hfe50d7b_0
certifi 2017.7.27.1 py36h043bc9e_0
cffi 1.10.0 py36hae3d1b5_1
chardet 3.0.4 py36h420ce6e_1
click 6.7 py36hec8c647_0
cloudpickle 0.4.0 py36h639d8dc_0
clyent 1.2.2 py36hb10d595_1
colorama 0.3.9 py36h029ae33_0
comtypes 1.1.2 py36heb9b3d1_0
conda 4.5.1 py36_0
conda-build 3.0.27 py36h309a530_0
conda-env 2.6.0 h36134e3_1
conda-verify 2.0.0 py36h065de53_0
console_shortcut 0.1.1 h6bb2dd7_3
contextlib2 0.5.5 py36he5d52c0_0
cryptography 2.0.3 py36h123decb_1
curl 7.55.1 vc14hdaba4a4_3 [vc14]
cycler 0.10.0 py36h009560c_0
cython 0.26.1 py36h18049ac_0
cytoolz 0.8.2 py36h547e66e_0
dask 0.15.3 py36h396fcb9_0
dask-core 0.15.3 py36hd651449_0
datashape 0.5.4 py36h5770b85_0
decorator 4.1.2 py36he63a57b_0
distlib 0.2.5 py36h51371be_0
distributed 1.19.1 py36h8504682_0
docutils 0.14 py36h6012d8f_0
entrypoints 0.2.3 py36hfd66bb0_2
et_xmlfile 1.0.1 py36h3d2d736_0
fastcache 1.0.2 py36hffdae1b_0
filelock 2.0.12 py36hd7ddd41_0
flask 0.12.2 py36h98b5e8f_0
flask-cors 3.0.3 py36h8a3855d_0
freetype 2.8 vc14h17c9bdf_0 [vc14]
get_terminal_size 1.0.0 h38e98db_0
gevent 1.2.2 py36h342a76c_0
glob2 0.5 py36h11cc1bd_1
greenlet 0.4.12 py36ha00ad21_0
h5py 2.7.0 py36hfbe0a52_1
hdf5 1.10.1 vc14hb361328_0 [vc14]
heapdict 1.0.0 py36h21fa5f4_0
html5lib 0.999999999 py36ha09b1f3_0
icc_rt 2017.0.4 h97af966_0
icu 58.2 vc14hc45fdbb_0 [vc14]
idna 2.6 py36h148d497_1
imageio 2.2.0 py36had6c2d2_0
imagesize 0.7.1 py36he29f638_0
intel-openmp 2018.0.0 hcd89f80_7
ipykernel 4.6.1 py36hbb77b34_0
ipython 6.1.0 py36h236ecc8_1
ipython_genutils 0.2.0 py36h3c5d0ee_0
ipywidgets 7.0.0 py36h2e74ada_0
isort 4.2.15 py36h6198cc5_0
itsdangerous 0.24 py36hb6c5a24_1
jdcal 1.3 py36h64a5255_0
jedi 0.10.2 py36hed927a0_0
jinja2 2.9.6 py36h10aa3a0_1
jpeg 9b vc14h4d7706e_1 [vc14]
jsonschema 2.6.0 py36h7636477_0
jupyter 1.0.0 py36h422fd7e_2
jupyter_client 5.1.0 py36h9902a9a_0
jupyter_console 5.2.0 py36h6d89b47_1
jupyter_core 4.3.0 py36h511e818_0
jupyterlab 0.27.0 py36h34cc53b_2
jupyterlab_launcher 0.4.0 py36h22c3ccf_0
lazy-object-proxy 1.3.1 py36hd1c21d2_0
libiconv 1.15 vc14h29686d3_5 [vc14]
libpng 1.6.32 vc14h5163883_3 [vc14]
libssh2 1.8.0 vc14hcf584a9_2 [vc14]
libtiff 4.0.8 vc14h04e2a1e_10 [vc14]
libxml2 2.9.4 vc14h8fd0f11_5 [vc14]
libxslt 1.1.29 vc14hf85b8d4_5 [vc14]
llvmlite 0.20.0 py36_0
locket 0.2.0 py36hfed976d_1
lockfile 0.12.2 py36h0468280_0
lxml 4.1.0 py36h0dcd83c_0
lzo 2.10 vc14h0a64fa6_1 [vc14]
markupsafe 1.0 py36h0e26971_1
matplotlib 2.1.0 py36h11b4b9c_0
mccabe 0.6.1 py36hb41005a_1
menuinst 1.4.10 py36h42196fb_0
mistune 0.7.4 py36h4874169_0
mkl 2018.0.0 h36b65af_4
mkl-service 1.1.2 py36h57e144c_4
mpmath 0.19 py36he326802_2
msgpack-python 0.4.8 py36h58b1e9d_0
multipledispatch 0.4.9 py36he44c36e_0
navigator-updater 0.1.0 py36h8a7b86b_0
nbconvert 5.3.1 py36h8dc0fde_0
nbformat 4.4.0 py36h3a5bc1b_0
networkx 2.0 py36hff991e3_0
nltk 3.2.4 py36hd0e0a39_0
nose 1.3.7 py36h1c3779e_2
notebook 5.0.0 py36hd9fbf6f_2
numba 0.35.0 np113py36_10
numexpr 2.6.2 py36h7ca04dc_1
numpy 1.13.3 py36ha320f96_0
numpydoc 0.7.0 py36ha25429e_0
odo 0.5.1 py36h7560279_0
olefile 0.44 py36h0a7bdd2_0
openpyxl 2.4.8 py36hf3b77f6_1
openssl 1.0.2l vc14hcac20b0_2 [vc14]
packaging 16.8 py36ha0986f6_1
pandas 0.20.3 py36hce827b7_2
pandoc 1.19.2.1 hb2460c7_1
pandocfilters 1.4.2 py36h3ef6317_1
partd 0.3.8 py36hc8e763b_0
path.py 10.3.1 py36h3dd8b46_0
pathlib2 2.3.0 py36h7bfb78b_0
patsy 0.4.1 py36h42cefec_0
pep8 1.7.0 py36h0f3d67a_0
pickleshare 0.7.4 py36h9de030f_0
pillow 4.2.1 py36hdb25ab2_0
pip 9.0.1 py36hadba87b_3
pkginfo 1.4.1 py36hb0f9cfa_1
ply 3.10 py36h1211beb_0
progress 1.3 py36hbeca8d3_0
prompt_toolkit 1.0.15 py36h60b8f86_0
psutil 5.4.0 py36h4e662fb_0
py 1.4.34 py36ha4aca3a_1
pycodestyle 2.3.1 py36h7cc55cd_0
pycosat 0.6.3 py36h413d8a4_0
pycparser 2.18 py36hd053e01_1
pycrypto 2.6.1 py36he68e6e2_1
pycurl 7.43.0 py36h086bf4c_3
pyflakes 1.6.0 py36h0b975d6_0
pygments 2.2.0 py36hb010967_0
pylint 1.7.4 py36ha4e6ded_0
pyodbc 4.0.17 py36h0006bc2_0
pyopenssl 17.2.0 py36h15ca2fc_0
pyparsing 2.2.0 py36h785a196_1
pyqt 5.6.0 py36hb5ed885_5
pysocks 1.6.7 py36h698d350_1
pytables 3.4.2 py36h71138e3_2
pytest 3.2.1 py36h753b05e_1
python 3.6.3 h9e2ca53_1
python-dateutil 2.6.1 py36h509ddcb_1
pytz 2017.2 py36h05d413f_1
pywavelets 0.5.2 py36hc649158_0
pywin32 221 py36h9c10281_0
pyyaml 3.12 py36h1d1928f_1
pyzmq 16.0.2 py36h38c27d9_2
qt 5.6.2 vc14h6f8c307_12 [vc14]
qtawesome 0.4.4 py36h5aa48f6_0
qtconsole 4.3.1 py36h99a29a9_0
qtpy 1.3.1 py36hb8717c5_0
requests 2.18.4 py36h4371aae_1
rope 0.10.5 py36hcaf5641_0
ruamel_yaml 0.11.14 py36h9b16331_2
scikit-image 0.13.0 py36h6dffa3f_1
scikit-learn 0.19.1 py36h53aea1b_0
scipy 0.19.1 py36h7565378_3
seaborn 0.8.0 py36h62cb67c_0
setuptools 36.5.0 py36h65f9e6e_0
simplegeneric 0.8.1 py36heab741f_0
singledispatch 3.4.0.3 py36h17d0c80_0
sip 4.18.1 py36h9c25514_2
six 1.11.0 py36h4db2310_1
snowballstemmer 1.2.1 py36h763602f_0
sortedcollections 0.5.3 py36hbefa0ab_0
sortedcontainers 1.5.7 py36ha90ac20_0
sphinx 1.6.3 py36h9bb690b_0
sphinxcontrib 1.0 py36hbbac3d2_1
sphinxcontrib-websupport 1.0.1 py36hb5e5916_1
spyder 3.2.4 py36h8845eaa_0
sqlalchemy 1.1.13 py36h5948d12_0
sqlite 3.20.1 vc14h7ce8c62_1 [vc14]
statsmodels 0.8.0 py36h6189b4c_0
sympy 1.1.1 py36h96708e0_0
tblib 1.3.2 py36h30f5020_0
testpath 0.3.1 py36h2698cfe_0
tk 8.6.7 vc14hb68737d_1 [vc14]
toolz 0.8.2 py36he152a52_0
tornado 4.5.2 py36h57f6048_0
traitlets 4.3.2 py36h096827d_0
typing 3.6.2 py36hb035bda_0
unicodecsv 0.14.1 py36h6450c06_0
urllib3 1.22 py36h276f60a_0
vc 14 h2379b0c_2
vs2015_runtime 14.0.25123 hd4c4e62_2
wcwidth 0.1.7 py36h3d5aa90_0
webencodings 0.5.1 py36h67c50ae_1
werkzeug 0.12.2 py36h866a736_0
wheel 0.29.0 py36h6ce6cde_1
widgetsnbextension 3.0.2 py36h364476f_1
win_inet_pton 1.0.1 py36he67d7fd_1
win_unicode_console 0.5 py36hcdbd4b5_0
wincertstore 0.2 py36h7fe50ca_0
wrapt 1.10.11 py36he5f5981_0
xlrd 1.1.0 py36h1cb58dc_1
xlsxwriter 1.0.2 py36hf723b7d_0
xlwings 0.11.4 py36hd3cf94d_0
xlwt 1.3.0 py36h1a4751e_0
yaml 0.1.7 vc14hb31d195_1 [vc14]
zict 0.1.3 py36h2d8e73e_0
zlib 1.2.11 vc14h1cdd9ab_1 [vc14]
安装 Scrapy
Scrapy 是爬虫的常用框架之一, 官网的安装提示如下:

conda install -c conda-forge scrapy
但是,我按照上述方法安装后出现如下问题:

CondaHTTPError: HTTP 000 CONNECTION FAILED for url <https://conda.anaconda.org/conda-forge/win-64/libssh2-1.8.0-vc14_2.tar.bz2>
Elapsed: –

An HTTP error occurred when trying to retrieve this URL.
HTTP errors are often intermittent, and a simple retry will get you on your way.

CondaHTTPError: HTTP 000 CONNECTION FAILED for url <https://conda.anaconda.org/conda-forge/noarch/hyperlink-17.3.1-py_0.tar.bz2>
Elapsed: –

An HTTP error occurred when trying to retrieve this URL.
HTTP errors are often intermittent, and a simple retry will get you on your way.

CondaHTTPError: HTTP 000 CONNECTION FAILED for url <https://conda.anaconda.org/conda-forge/win-64/pydispatcher-2.0.5-py36_0.tar.bz2>
Elapsed: –

An HTTP error occurred when trying to retrieve this URL.
HTTP errors are often intermittent, and a simple retry will get you on your way.

CondaHTTPError: HTTP 000 CONNECTION FAILED for url <https://conda.anaconda.org/conda-forge/win-64/yaml-0.1.7-vc14_0.tar.bz2>
Elapsed: –

An HTTP error occurred when trying to retrieve this URL.
HTTP errors are often intermittent, and a simple retry will get you on your way.

CondaHTTPError: HTTP 000 CONNECTION FAILED for url <https://conda.anaconda.org/conda-forge/win-64/qt-5.6.2-vc14_1.tar.bz2>
Elapsed: –

An HTTP error occurred when trying to retrieve this URL.
HTTP errors are often intermittent, and a simple retry will get you on your way.
有一些包安装失败,原因可能是上述命令使用的资源通道下载速度太慢导致连接不上,于是改用如下方法:

先查看 conda 上有没有提供当前 python 版本的 scrapy 包

>conda search scrapy
Loading channels: done
# Name Version Build Channel
scrapy 0.16.4 py26_0 pkgs/free
scrapy 0.16.4 py27_0 pkgs/free
scrapy 0.24.4 py27_0 pkgs/free
scrapy 1.0.1 py27_0 pkgs/free
scrapy 1.0.3 py27_0 pkgs/free
scrapy 1.1.1 py27_0 pkgs/free
scrapy 1.1.1 py34_0 pkgs/free
scrapy 1.1.1 py35_0 pkgs/free
scrapy 1.1.1 py36_0 pkgs/free
scrapy 1.3.3 py27_0 pkgs/free
scrapy 1.3.3 py35_0 pkgs/free
scrapy 1.3.3 py36_0 pkgs/free
scrapy 1.4.0 py27h4eaa785_1 pkgs/main
scrapy 1.4.0 py35h054a469_1 pkgs/main
scrapy 1.4.0 py36h764da0a_1 pkgs/main
scrapy 1.5.0 py27_0 pkgs/main
scrapy 1.5.0 py35_0 pkgs/main
scrapy 1.5.0 py36_0 pkgs/main
我的 python 版本是 3.6,可以看到列表最下面一行就是 python3.6 最新的 scrapy 版本,于是使用如下命令安装:

>conda install scrapy
Solving environment: done

## Package Plan ##

environment location: D:\ProgramFiles\Anaconda

added / updated specs:
– scrapy

The following packages will be downloaded:

package | build
—————————|—————–
attrs-17.4.0 | py36_0 41 KB
pyasn1-0.4.2 | py36h22e697c_0 101 KB
hyperlink-18.0.0 | py36_0 62 KB
openssl-1.0.2o | h8ea7d77_0 5.4 MB
pyasn1-modules-0.2.1 | py36hd1453cb_0 86 KB
pytest-runner-4.2 | py36_0 12 KB
ca-certificates-2018.03.07 | 0 155 KB
scrapy-1.5.0 | py36_0 329 KB
automat-0.6.0 | py36hc6d8c19_0 67 KB
constantly-15.1.0 | py36_0 13 KB
cssselect-1.0.3 | py36_0 28 KB
incremental-17.5.0 | py36he5b1da3_0 25 KB
certifi-2018.4.16 | py36_0 143 KB
pydispatcher-2.0.5 | py36_0 18 KB
————————————————————
Total: 6.4 MB

The following NEW packages will be INSTALLED:

attrs: 17.4.0-py36_0
automat: 0.6.0-py36hc6d8c19_0
constantly: 15.1.0-py36_0
cssselect: 1.0.3-py36_0
hyperlink: 18.0.0-py36_0
incremental: 17.5.0-py36he5b1da3_0
parsel: 1.4.0-py36_0
pyasn1: 0.4.2-py36h22e697c_0
pyasn1-modules: 0.2.1-py36hd1453cb_0
pydispatcher: 2.0.5-py36_0
pytest-runner: 4.2-py36_0
queuelib: 1.5.0-py36_0
scrapy: 1.5.0-py36_0
service_identity: 17.0.0-py36_0
twisted: 17.5.0-py36_0
w3lib: 1.19.0-py36_0
zope: 1.0-py36_0
zope.interface: 4.5.0-py36hfa6e2cd_0

The following packages will be UPDATED:

ca-certificates: 2017.08.26-h94faf87_0 –> 2018.03.07-0
certifi: 2017.7.27.1-py36h043bc9e_0 –> 2018.4.16-py36_0
openssl: 1.0.2l-vc14hcac20b0_2 –> 1.0.2o-h8ea7d77_0

Proceed ([y]/n)? y

选择 y 后继续安装:

Downloading and Extracting Packages
attrs 17.4.0################################################################################################### | 100%
pyasn1 0.4.2################################################################################################### | 100%
hyperlink 18.0.0############################################################################################### | 100%
openssl 1.0.2o################################################################################################# | 100%
pyasn1-modules 0.2.1########################################################################################### | 100%
pytest-runner 4.2############################################################################################## | 100%
ca-certificates 2018.03.07##################################################################################### | 100%
scrapy 1.5.0################################################################################################### | 100%
automat 0.6.0################################################################################################## | 100%
constantly 15.1.0############################################################################################## | 100%
cssselect 1.0.3################################################################################################ | 100%
incremental 17.5.0############################################################################################# | 100%
certifi 2018.4.16############################################################################################## | 100%
pydispatcher 2.0.5############################################################################################# | 100%
Preparing transaction: done
Verifying transaction: done
Executing transaction: done
安装完成,最后可以通过

>conda list


查看Scrapy安装是否成功。
————————————————

版权声明:本文为CSDN博主「supercrys」的原创文章,遵循CC 4.0 BY-SA版权协议,转载请附上原文出处链接及本声明。
原文链接:https://blog.csdn.net/crysdem/article/details/80112709

Python 爬虫的工具列表大全

即然提到了爬虫,就从网上理了一份python爬虫相关的包。包含与网页抓取和数据处理的Python库,需要的朋友可以参考下

网络

  • 通用
    • urllib -网络库(stdlib)。
    • requests -网络库。
    • grab – 网络库(基于pycurl)。
    • pycurl – 网络库(绑定libcurl)。
    • urllib3 – Python HTTP库,安全连接池、支持文件post、可用性高。
    • httplib2 – 网络库。
    • RoboBrowser – 一个简单的、极具Python风格的Python库,无需独立的浏览器即可浏览网页。
    • MechanicalSoup -一个与网站自动交互Python库。
    • mechanize -有状态、可编程的Web浏览库。
    • socket – 底层网络接口(stdlib)。
    • Unirest for Python – Unirest是一套可用于多种语言的轻量级的HTTP库。
    • hyper – Python的HTTP/2客户端。
    • PySocks – SocksiPy更新并积极维护的版本,包括错误修复和一些其他的特征。作为socket模块的直接替换。
  • 异步
    • treq – 类似于requests的API(基于twisted)。
    • aiohttp – asyncio的HTTP客户端/服务器(PEP-3156)。

网络爬虫框架

  • 功能齐全的爬虫
    • grab – 网络爬虫框架(基于pycurl/multicur)。
    • scrapy – 网络爬虫框架(基于twisted),不支持Python3。
    • pyspider – 一个强大的爬虫系统。
    • cola – 一个分布式爬虫框架。
  • 其他
    • portia – 基于Scrapy的可视化爬虫。
    • restkit – Python的HTTP资源工具包。它可以让你轻松地访问HTTP资源,并围绕它建立的对象。
    • demiurge – 基于PyQuery的爬虫微框架。

HTML/XML解析器

  • 通用
    • lxml – C语言编写高效HTML/ XML处理库。支持XPath。
    • cssselect – 解析DOM树和CSS选择器。
    • pyquery – 解析DOM树和jQuery选择器。
    • BeautifulSoup – 低效HTML/ XML处理库,纯Python实现。
    • html5lib – 根据WHATWG规范生成HTML/ XML文档的DOM。该规范被用在现在所有的浏览器上。
    • feedparser – 解析RSS/ATOM feeds。
    • MarkupSafe – 为XML/HTML/XHTML提供了安全转义的字符串。
    • xmltodict – 一个可以让你在处理XML时感觉像在处理JSON一样的Python模块。
    • xhtml2pdf – 将HTML/CSS转换为PDF。
    • untangle – 轻松实现将XML文件转换为Python对象。
  • 清理
    • Bleach – 清理HTML(需要html5lib)。
    • sanitize – 为混乱的数据世界带来清明。

文本处理

用于解析和操作简单文本的库。

  • 通用
  • difflib – (Python标准库)帮助进行差异化比较。
  • Levenshtein – 快速计算Levenshtein距离和字符串相似度。
  • fuzzywuzzy – 模糊字符串匹配。
  • esmre – 正则表达式加速器。
  • ftfy – 自动整理Unicode文本,减少碎片化。
  • 转换
  • unidecode – 将Unicode文本转为ASCII。
  • 字符编码
  • uniout – 打印可读字符,而不是被转义的字符串。
  • chardet – 兼容 Python的2/3的字符编码器。
  • xpinyin – 一个将中国汉字转为拼音的库。
  • pangu.py – 格式化文本中CJK和字母数字的间距。
  • Slug化
  • awesome-slugify – 一个可以保留unicode的Python slugify库。
  • python-slugify – 一个可以将Unicode转为ASCII的Python slugify库。
  • unicode-slugify – 一个可以将生成Unicode slugs的工具。
  • pytils – 处理俄语字符串的简单工具(包括pytils.translit.slugify)。
  • 通用解析器
  • PLY – lex和yacc解析工具的Python实现。
  • pyparsing – 一个通用框架的生成语法分析器。
  • 人的名字
  • python-nameparser -解析人的名字的组件。
  • 电话号码
  • phonenumbers -解析,格式化,存储和验证国际电话号码。
  • 用户代理字符串
  • python-user-agents – 浏览器用户代理的解析器。
  • HTTP Agent Parser – Python的HTTP代理分析器。

特定格式文件处理

解析和处理特定文本格式的库。

  • 通用
  • tablib – 一个把数据导出为XLS、CSV、JSON、YAML等格式的模块。
  • textract – 从各种文件中提取文本,比如 Word、PowerPoint、PDF等。
  • messytables – 解析混乱的表格数据的工具。
  • rows – 一个常用数据接口,支持的格式很多(目前支持CSV,HTML,XLS,TXT – 将来还会提供更多!)。
  • Office
  • python-docx – 读取,查询和修改的Microsoft Word2007/2008的docx文件。
  • xlwt / xlrd – 从Excel文件读取写入数据和格式信息。
  • XlsxWriter – 一个创建Excel.xlsx文件的Python模块。
  • xlwings – 一个BSD许可的库,可以很容易地在Excel中调用Python,反之亦然。
  • openpyxl – 一个用于读取和写入的Excel2010 XLSX/ XLSM/ xltx/ XLTM文件的库。
  • Marmir – 提取Python数据结构并将其转换为电子表格。
  • PDF
  • PDFMiner – 一个从PDF文档中提取信息的工具。
  • PyPDF2 – 一个能够分割、合并和转换PDF页面的库。
  • ReportLab – 允许快速创建丰富的PDF文档。
  • pdftables – 直接从PDF文件中提取表格。
  • Markdown
  • Python-Markdown – 一个用Python实现的John Gruber的Markdown。
  • Mistune – 速度最快,功能全面的Markdown纯Python解析器。
  • markdown2 – 一个完全用Python实现的快速的Markdown。
  • YAML
  • PyYAML – 一个Python的YAML解析器。
  • CSS
  • cssutils – 一个Python的CSS库。
  • ATOM/RSS
  • feedparser – 通用的feed解析器。
  • SQL
  • sqlparse – 一个非验证的SQL语句分析器。
  • HTTP
  • HTTP
  • http-parser – C语言实现的HTTP请求/响应消息解析器。

Python客栈送红包、纸质书

  • 微格式
  • opengraph – 一个用来解析Open Graph协议标签的Python模块。
  • 可移植的执行体
  • pefile – 一个多平台的用于解析和处理可移植执行体(即PE)文件的模块。
  • PSD
  • psd-tools – 将Adobe Photoshop PSD(即PE)文件读取到Python数据结构。

自然语言处理

处理人类语言问题的库。

  • NLTK -编写Python程序来处理人类语言数据的最好平台。
  • Pattern – Python的网络挖掘模块。他有自然语言处理工具,机器学习以及其它。
  • TextBlob – 为深入自然语言处理任务提供了一致的API。是基于NLTK以及Pattern的巨人之肩上发展的。
  • jieba – 中文分词工具。
  • SnowNLP – 中文文本处理库。
  • loso – 另一个中文分词库。
  • genius – 基于条件随机域的中文分词。
  • langid.py – 独立的语言识别系统。
  • Korean – 一个韩文形态库。
  • pymorphy2 – 俄语形态分析器(词性标注+词形变化引擎)。
  • PyPLN – 用Python编写的分布式自然语言处理通道。这个项目的目标是创建一种简单的方法使用NLTK通过网络接口处理大语言库。

浏览器自动化与仿真

  • selenium – 自动化真正的浏览器(Chrome浏览器,火狐浏览器,Opera浏览器,IE浏览器)。
  • Ghost.py – 对PyQt的webkit的封装(需要PyQT)。
  • Spynner – 对PyQt的webkit的封装(需要PyQT)。
  • Splinter – 通用API浏览器模拟器(selenium web驱动,Django客户端,Zope)。

多重处理

  • threading – Python标准库的线程运行。对于I/O密集型任务很有效。对于CPU绑定的任务没用,因为python GIL。
  • multiprocessing – 标准的Python库运行多进程。
  • celery – 基于分布式消息传递的异步任务队列/作业队列。
  • concurrent-futures – concurrent-futures 模块为调用异步执行提供了一个高层次的接口。

异步

异步网络编程库

  • asyncio – (在Python 3.4 +版本以上的 Python标准库)异步I/O,时间循环,协同程序和任务。
  • Twisted – 基于事件驱动的网络引擎框架。
  • Tornado – 一个网络框架和异步网络库。
  • pulsar – Python事件驱动的并发框架。
  • diesel – Python的基于绿色事件的I/O框架。
  • gevent – 一个使用greenlet 的基于协程的Python网络库。
  • eventlet – 有WSGI支持的异步框架。
  • Tomorrow – 异步代码的奇妙的修饰语法。

队列

  • celery – 基于分布式消息传递的异步任务队列/作业队列。
  • huey – 小型多线程任务队列。
  • mrq – Mr. Queue – 使用redis & Gevent 的Python分布式工作任务队列。
  • RQ – 基于Redis的轻量级任务队列管理器。
  • simpleq – 一个简单的,可无限扩展,基于Amazon SQS的队列。
  • python-gearman – Gearman的Python API。

云计算

  • picloud – 云端执行Python代码。
  • dominoup.com – 云端执行R,Python和matlab代码。

电子邮件

电子邮件解析库

  • flanker – 电子邮件地址和Mime解析库。
  • Talon – Mailgun库用于提取消息的报价和签名。

网址和网络地址操作

解析/修改网址和网络地址库。

  • URL
    • furl – 一个小的Python库,使得操纵URL简单化。
    • purl – 一个简单的不可改变的URL以及一个干净的用于调试和操作的API。
    • urllib.parse – 用于打破统一资源定位器(URL)的字符串在组件(寻址方案,网络位置,路径等)之间的隔断,为了结合组件到一个URL字符串,并将“相对URL”转化为一个绝对URL,称之为“基本URL”。
    • tldextract – 从URL的注册域和子域中准确分离TLD,使用公共后缀列表。
  • 网络地址
    • netaddr – 用于显示和操纵网络地址的Python库。

网页内容提取

提取网页内容的库。

  • HTML页面的文本和元数据
    • newspaper – 用Python进行新闻提取、文章提取和内容策展。
    • html2text – 将HTML转为Markdown格式文本。
    • python-goose – HTML内容/文章提取器。
    • lassie – 人性化的网页内容检索工具
    • micawber – 一个从网址中提取丰富内容的小库。
    • sumy -一个自动汇总文本文件和HTML网页的模块
    • Haul – 一个可扩展的图像爬虫。
    • python-readability – arc90 readability工具的快速Python接口。
    • scrapely – 从HTML网页中提取结构化数据的库。给出了一些Web页面和数据提取的示例,scrapely为所有类似的网页构建一个分析器。
  • 视频
    • youtube-dl – 一个从YouTube下载视频的小命令行程序。
    • you-get – Python3的YouTube、优酷/ Niconico视频下载器。
  • 维基
    • WikiTeam – 下载和保存wikis的工具。

WebSocket

用于WebSocket的库。

  • Crossbar – 开源的应用消息传递路由器(Python实现的用于Autobahn的WebSocket和WAMP)。
  • AutobahnPython – 提供了WebSocket协议和WAMP协议的Python实现并且开源。
  • WebSocket-for-Python – Python 2和3以及PyPy的WebSocket客户端和服务器库。

DNS解析

  • dnsyo – 在全球超过1500个的DNS服务器上检查你的DNS。
  • pycares – c-ares的接口。c-ares是进行DNS请求和异步名称决议的C语言库。

计算机视觉

  • OpenCV – 开源计算机视觉库。
  • SimpleCV – 用于照相机、图像处理、特征提取、格式转换的简介,可读性强的接口(基于OpenCV)。
  • mahotas – 快速计算机图像处理算法(完全使用 C++ 实现),完全基于 numpy 的数组作为它的数据类型。

代理服务器

  • shadowsocks – 一个快速隧道代理,可帮你穿透防火墙(支持TCP和UDP,TFO,多用户和平滑重启,目的IP黑名单)。
  • tproxy – tproxy是一个简单的TCP路由代理(第7层),基于Gevent,用Python进行配置。

其他Python工具列表

  • awesome-python
  • pycrumbs
  • python-github-projects
  • python_reference
  • pythonidae

selenium+chromedriver在服务器运行的详细教程

这篇文章主要介绍了selenium+chromedriver在服务器运行的详细方法,本文给大家介绍的非常详细,对大家的学习或工作具有一定的参考借鉴价值,需要的朋友可以参考下

1.前言

想使用selenium从网站上抓数据,但有时候使用phantomjs会出错。chrome现在也有无界面运行模式了,以后就可以不用phantomjs了。

但在服务器安装chrome时出现了一些错误,这里总结一下整个安装过程

2.ubuntu上安装chrome

1
2
3
4
5
6
# Install Google Chrome
# https://askubuntu.com/questions/79280/how-to-install-chrome-browser-properly-via-command-line
sudo apt-get install libxss1 libappindicator1 libindicator7
wget https://dl.google.com/linux/direct/google-chrome-stable_current_amd64.deb
sudo dpkg -i google-chrome*.deb # Might show "errors", fixed by next line
sudo apt-get install -f

这时应该已经安装好了,用下边的命行运行测试一下:

google-chrome –headless –remote-debugging-port=9222 https://chromium.org –disable-gpu

这里是使用headless模式进行远程调试,ubuntu上大多没有gpu,所以–disable-gpu以免报错。
之后可以再打开一个ssh连接到服务器,使用命令行访问服务器的本地的9222端口:

curl http://localhost:9222

如果安装好了,会看到调试信息。但我这里会报一个错误,下边是错误的解决办法。

1)可能的错误解决方法

运行完上边的命令可能会报一个不能在root下运行chrome的错误。这个时候使用下边方设置一下chrome

1.找到google-chrome文件

我的位置位于/opt/google/chrome/

2.用vi打开google-chrome文件

vi /opt/google/chrome/google-chrome

在文件中找到

exec -a “$0” “$HERE/chrome” “$@”

3.在后面添加 –user-data-dir –no-sandbox即可,整条shell命令就是

exec -a “$0” “$HERE/chrome” “$@” –user-data-dir –no-sandbox

4.再重新打开google-chrome即可正常访问!

3.安装chrome驱动chromedriver

下载chromedriver

chromedriver提供了操作chrome的api,是selenium控制chrome的桥梁。

chromedriver最好安装最新版的,记的我一开始安装的不是最新版的,会报一个错。用最新版的chromedriver就没有问题,最新版的可以在下边地址找到
https://sites.google.com/a/chromium.org/chromedriver/downloads

我写这个文章时最新版是2.37

wget https://chromedriver.storage.googleapis.com/2.37/chromedriver_linux64.zip
unzip chromedriver_linux64.zip

到这里服务器端的无界面版chrome就安装好了。

4.无界面版chrome使用方法

1
2
3
4
5
6
7
8
9
10
11
12
13
from selenium import webdriver
chrome_options = webdriver.ChromeOptions()
chrome_options.add_argument('--headless')
chrome_options.add_argument('--disable-gpu')
chrome_options.add_argument("user-agent='Mozilla/5.0 (X11; Linux x86_64) AppleWebKit/537.36 (KHTML, like Gecko) Chrome/62.0.3202.94 Safari/537.36'")
wd = webdriver.Chrome(chrome_options=chrome_options,executable_path='/home/chrome/chromedriver')
wd.get("https://www.163.com")
content = wd.page_source.encode('utf-8')
print content
wd.quit()

这里chrome_options中的第三项设置参数,使用这个设置可以避免网站检测到你使用的是无界模式进行反抓取。

下边另外的两项设置,不进行设置时在桌面版linux系统,或者mac系统上会打开有界面的chrome.调试时可以注释掉下边两行使用有界面版chrome来调试程序。

1
2
chrome_options.add_argument('--headless')
chrome_options.add_argument('--disable-gpu')

在linux中安装selenium+chrome

主要参照百度的一些内容加上自己的实际操作,对自己遇到的几个问题进行总结:

第一个问题:安装selenium—sudo pip install selenium

显示:You are using pip version 8.1.1, however version 18.0 is available.

pip的版本太低

解决方案:

更新pip

运行代码:sudo pip install –upgrade pip


第二个问题:安装chrome–

第一步:sudo apt-get install libxss1 libappindicator1 libindicator7

第二步:wget https://dl.google.com/linux/direct/google-chrome-stable_current_amd64.deb

第三步:sudo qpt-get install -f

第四步:sudo dpkg -i google-chrome-stable_current_amd64.deb

第三个问题:安装chromedriver—

第一步:wget -N http://chromedriver.storage.googleapis.com/2.29/chromedriver_linux64.zip

第二步:unzip chromedriver_linux64.zip

第三步:chmod +x chromedriver

第四步:sudo mv -f chromedriver /usr/local/share/chromedriver

第五步: sudo ln -s /usr/local/share/chromedriver /usr/local/bin/chromedriver

第六步:sudo ln -s /usr/local/share/chromedriver /usr/bin/chromedrive

在敲代码时一定要仔细,任何字母的错都将导致最后出错。

Selenium启动Chrome时配置选项详解

 更新时间:2020年03月18日 11:25:14   作者:廖剑秋
这篇文章主要介绍了Selenium启动Chrome时配置选项详解,文中通过示例代码介绍的非常详细,对大家的学习或者工作具有一定的参考学习价值,需要的朋友们下面随着小编来一起学习学习吧

Selenium操作浏览器是不加载任何配置的,网上找了半天,关于Firefox加载配置的多点,Chrome资料很少,下面是关于加载Chrome配置的方法:

一、加载所有Chrome配置

用Chrome地址栏输入chrome://version/,查看自己的“个人资料路径”,然后在浏览器启动时,调用这个配置文件,代码如下:

1
2
3
4
5
#coding=utf-8
from selenium import webdriver
option = webdriver.ChromeOptions()
option.add_argument('--user-data-dir=C:\Users\Administrator\AppData\Local\Google\Chrome\User Data') #设置成用户自己的数据目录
driver = webdriver.Chrome(chrome_options=option)

二、修改浏览器的User-Agent来伪装你的浏览器访问手机m站

1
2
3
4
5
6
#coding=utf-8
from selenium import webdriver
option = webdriver.ChromeOptions()
option.add_argument('--user-agent=iphone')
driver = webdriver.Chrome(chrome_options=option)
driver.get('http://www.taobao.com/')

三、浏览器启动时安装crx扩展

1
2
3
4
5
6
#coding=utf-8
from selenium import webdriver
option = webdriver.ChromeOptions()
option.add_extension('d:\crx\AdBlock_v2.17.crx') #自己下载的crx路径
driver = webdriver.Chrome(chrome_options=option)
driver.get('http://www.taobao.com/')

可以去https://sites.google.com/a/chromium.org/chromedriver/capabilities查看更多,或者去http://stackoverflow.com/查找。

下边是收集的一些配置信息:

一些Chrome的地址栏命令(这些命令会不停的变动,所有不一定都是好用的)

在Chrome的浏览器地址栏中输入以下命令,就会返回相应的结果。这些命令包括查看内存状态,浏览器状态,网络状态,DNS服务器状态,插件缓存等等。
about:version – 显示当前版本
about:memory – 显示本机浏览器内存使用状况
about:plugins – 显示已安装插件
about:histograms – 显示历史记录
about:dns – 显示DNS状态
about:cache – 显示缓存页面
about:gpu -是否有硬件加速
about:flags -开启一些插件 //使用后弹出这么些东西:“请小心,这些实验可能有风险”,不知会不会搞乱俺的配置啊!
chrome://extensions/ – 查看已经安装的扩展
其他的一些关于Chrome的实用参数及简要的中文说明(使用方法同上,当然也可以在shell中使用)
–user-data-dir=”[PATH]” 指定用户文件夹User Data路径,可以把书签这样的用户数据保存在系统分区以外的分区。
–disk-cache-dir=”[PATH]“ 指定缓存Cache路径
–disk-cache-size= 指定Cache大小,单位Byte
–first run 重置到初始状态,第一次运行
–incognito 隐身模式启动
–disable-javascript 禁用Javascript
–omnibox-popup-count=”num” 将地址栏弹出的提示菜单数量改为num个。我都改为15个了。
–user-agent=”xxxxxxxx” 修改HTTP请求头部的Agent字符串,可以通过about:version页面查看修改效果
–disable-plugins 禁止加载所有插件,可以增加速度。可以通过about:plugins页面查看效果
–disable-javascript 禁用JavaScript,如果觉得速度慢在加上这个
–disable-java 禁用java
–start-maximized 启动就最大化
–no-sandbox 取消沙盒模式
–single-process 单进程运行
–process-per-tab 每个标签使用单独进程
–process-per-site 每个站点使用单独进程
–in-process-plugins 插件不启用单独进程
–disable-popup-blocking 禁用弹出拦截
–disable-plugins 禁用插件
–disable-images 禁用图像
–incognito 启动进入隐身模式
–enable-udd-profiles 启用账户切换菜单
–proxy-pac-url 使用pac代理 [via 1/2]
–lang=zh-CN 设置语言为简体中文
–disk-cache-dir 自定义缓存目录
–disk-cache-size 自定义缓存最大值(单位byte)
–media-cache-size 自定义多媒体缓存最大值(单位byte)
–bookmark-menu 在工具 栏增加一个书签按钮
–enable-sync 启用书签同步

常用:

–single-process 单进程运行Google Chrome

–start-maximized 启动Google Chrome就最大化

–disable-java 禁止Java

–no-sandbox  非沙盒模式运行

全部:(下面的没有进行翻译,仔细看下应该都看得懂. ~ ~)

–disable-hang-monitor

Suppresses hang monitor dialogs in renderer processes.

–disable-metrics

Completely disables UMA metrics system.

–disable-metrics-reporting

Disables only the sending of metrics reports. In contrast to kDisableMetrics, this executes all the code that a normal client would use for reporting, except the report is dropped rather than sent to the server. This is useful for finding issues in the metrics code during UI and performance tests.

–assert-test

Causes the browser process to throw an assertion on startup.

–renderer-assert-test

Causes the renderer process to throw an assertion on launch.

–crash-test

Performs a crash test when the browser is starte.

–renderer-crash-test

Causes the renderer process to crash on launch.

–renderer-startup-dialog

Use this argument when you want to see the child processes as soon as Chrome start.

–plugin-startup-dialog

Causes the plugin process to display a dialog on launch.

–testshell-startup-dialog

Causes the test shell process to display a dialog on launch.

–plugin-launcher

Specifies a command that should be used to launch the plugin process. Useful

for running the plugin process through purify or quantify. Ex:

–plugin-launcher=”path\to\purify /Run=yes.

–plugin-launche.

–channel

The value of this switch tells the child process which

IPC channel the browser expects to use to communicate with it.

–testing-channel

The value of this switch tells the app to listen for and broadcast

testing-related messages on IPC channel with the given ID.

–homepage

The value of this switch specifies which page will be displayed

in newly-opened tabs. We need this for testing purposes so

that the UI tests don’t depend on what comes up for http://google.com.

–start-renderers-manually

When this switch is present, the browser will throw up a dialog box

asking the user to start a renderer process independently rather

than launching the renderer itself. (This is useful for debugging..

–renderer

Causes the process to run as renderer instead of as browser.

–renderer-path

Path to the executable to run for the renderer subproces.

–plugin

Causes the process to run as plugin hos.

–single-process

Runs the renderer and plugins in the same process as the browse.

–process-per-tab

Runs each set of script-connected tabs (i.e., a BrowsingInstance) in its own

renderer process. We default to using a renderer process for each

site instance (i.e., group of pages from the same registered domain with

script connections to each other).

–process-per-site

Runs a single process for each site (i.e., group of pages from the same

registered domain) the user visits. We default to using a renderer process

for each site instance (i.e., group of pages from the same registered

domain with script connections to each other).

–in-process-plugins

Runs plugins inside the renderer proces.

–no-sandbox

Runs the renderer outside the sandbox.

–safe-plugins

Runs the plugin processes inside the sandbox.

–trusted-plugins

Excludes these plugins from the plugin sandbox.

This is a comma separated list of plugin dlls name and activex clsid.

–test-sandbox

Runs the security test for the sandbox.

–user-data-dir

Specifies the user data directory, which is where the browser will look

for all of its state.

–app

Specifies that the associated value should be launched in “application” mode.

–upload-file

Specifies the file that should be uploaded to the provided application. This

switch is expected to be used with –app option.

–dom-automation

Specifies if the dom_automation_controller_ needs to be bound in the

renderer. This binding happens on per-frame basis and hence can potentially

be a performance bottleneck. One should only enable it when automating

dom based tests.

–plugin-path

Tells the plugin process the path of the plugin to loa.

–js-flags

Specifies the flags passed to JS engin.

–geoid

The GeoID we should use. This is normally obtained from the operating system

during first run and cached in the preferences afterwards. This is a numeric

value; see http://msdn.microsoft.com/en-us/library/ms776390.aspx .

–lang

The language file that we want to try to open. Of the form

language[-country] where language is the 2 letter code from ISO-639.

–debug-children

Will add kDebugOnStart to every child processes. If a value is passed, it

will be used as a filter to determine if the child process should have the

kDebugOnStart flag passed on or not.

–debug-on-start

Causes the process to start the JIT debugger on itself (mainly used by –debug-children.

–wait-for-debugger-children

Will add kWaitForDebugger to every child processes. If a value is passed, it

will be used as a filter to determine if the child process should have the

kWaitForDebugger flag passed on or not.

–wait-for-debugger

Waits for a debugger for 60 second.

–log-filter-prefix

Will filter log messages to show only the messages that are prefixed

with the specified valu.

–enable-logging

Python客栈送红包、纸质书

Force logging to be enabled. Logging is disabled by default in release

builds.

–dump-histograms-on-exit

Dump any accumualted histograms to the log when browser terminates (requires

logging to be enabled to really do anything). Used by developers and test

scripts.

–disable-logging

Force logging to be disabled. Logging is enabled by default in debug

builds.

–log-level

Sets the minimum log level. Valid values are from 0 to 3:

INFO = 0, WARNING = 1, LOG_ERROR = 2, LOG_FATAL = 3.

–remote-shell-port

Enable remote debug / automation shell on the specified por.

–uninstall

Runs un-installation steps that were done by chrome first-run.

–omnibox-popup-count

Number of entries to show in the omnibox popup.

–uninstallomnibox-popup-count

Removes the previous set suggestion coun.

–automation-channel

The value of this switch tells the app to listen for and broadcast

automation-related messages on IPC channel with the given ID.

–restore-last-session

Indicates the last session should be restored on startup. This overrides

the preferences value and is primarily intended for testing.

–record-mode

–playback-mode

Chrome supports a playback and record mode. Record mode saves *everything*

to the cache. Playback mode reads data exclusively from the cache. This

allows us to record a session into the cache and then replay it at will.

–no-events

Don’t record/playback events when using record & playback.

–hide-icons

–show-icons

Make Windows happy by allowing it to show “Enable access to this program”

checkbox in Add/Remove Programs->Set Program Access and Defaults. This

only shows an error box because the only way to hide Chrome is by

uninstalling it.

–make-default-browser

Make Chrome default browse.

–proxy-server

Use a specified proxy server, overrides system settings. This switch only

affects HTTP and HTTPS requests.

–dns-log-details

–dns-prefetch-disable

Chrome will support prefetching of DNS information. Until this becomes

the default, we’ll provide a command line switch.

–debug-print

Enables support to debug printing subsystem.

–allow-all-activex

Allow initialization of all activex controls. This is only to help website

developers test their controls to see if they are compatible in Chrome.

Note there’s a duplicate value in activex_shared.cc (to avoid

dependency on chrome module). Please change both locations at the same time.

–disable-dev-tools

Browser flag to disable the web inspector for all renderers.

–always-enable-dev-tools

Enable web inspector for all windows, even if they’re part of the browser.

Allows us to use our dev tools to debug browser windows itself.

–memory-model

Configure Chrome’s memory model.

Does chrome really need multiple memory models? No. But we get a lot

of concerns from individuals about how the changes work on *their*

system, and we need to be able to experiment with a few choices.

–tab-count-to-load-on-session-restore

Used to set the value of SessionRestore::num_tabs_to_load_. See session_restore.h for details.

const wchar_t kTabCountToLoadOnSessionRestore[] .

–memory-profile

Enable dynamic loading of the Memory Profiler DLL, which will trace

all memory allocations during the run.

–enable-file-cookies

By default, cookies are not allowed on file://. They are needed in for

testing, for example page cycler and layout tests. See bug 1157243.

–start-maximized

Start the browser maximized, regardless of any previous settings.

TODO(pjohnson): Remove this once bug 1137420 is fixed. We are using this

as a workaround for not being able to use moveTo and resizeTo on a

top-level window.

–enable-watchdog

Spawn threads to watch for excessive delays in specified message loops.

User should set breakpoints on Alarm() to examine problematic thread.

Usage: -enable-watchdog=[ui][io]

Order of the listed sub-arguments does not matter.

–first-run

Display the First Run experience when the browser is started, regardless of

whether or not it’s actually the first run.

–message-loop-strategy

–message-loop-histogrammer

Enable histograming of tasks served by MessageLoop. See about:histograms/Loop

for results, which show frequency of messages on each thread, including APC

count, object signalling count, etc.

–import

Perform importing from another browser. The value associated with this

setting encodes the target browser and what items to import.

–silent-dump-on-dcheck

Change the DCHECKS to dump memory and continue instead of crashing.

This is valid only in Release mode when –enable-dcheck is specified.

–disable-prompt-on-repost

Normally when the user attempts to navigate to a page that was the result of

a post we prompt to make sure they want to. This switch may be used to

disable that check. This switch is used during automated testing.

–disable-popup-blocking

Disable pop-up blocking.

–disable-javascript

Don’t execute JavaScript (browser JS like the new tab page still runs).

–disable-java

Prevent Java from running.

–disable-plugins

Prevent plugins from running.

–disable-images

Prevent images from loading.

–use-lf-heap

Use the low fragmentation heap for the CRT.

–gears-plugin-path

Debug only switch to specify which gears plugin dll to load.

–gears-in-renderer

Switch to load Gears in the renderer process.

–enable-p13n

–javascript-debugger-path

Allow loading of the javascript debugger UI from the filesystem.

–new-http

Enable new HTTP stack.

到此这篇关于Selenium启动Chrome时配置选项详解的文章就介绍到这了,更多相关Selenium启动Chrome内容请搜索脚本之家以前的文章或继续浏览下面的相关文章希望大家以后多多支持脚本之家!

Selenium常见异常解析及解决方案示范

 更新时间:2020年04月10日 12:01:38   作者:临渊
这篇文章主要介绍了Selenium常见异常解析及解决方案示范,文中通过示例代码介绍的非常详细,对大家的学习或者工作具有一定的参考学习价值,需要的朋友可以参考下

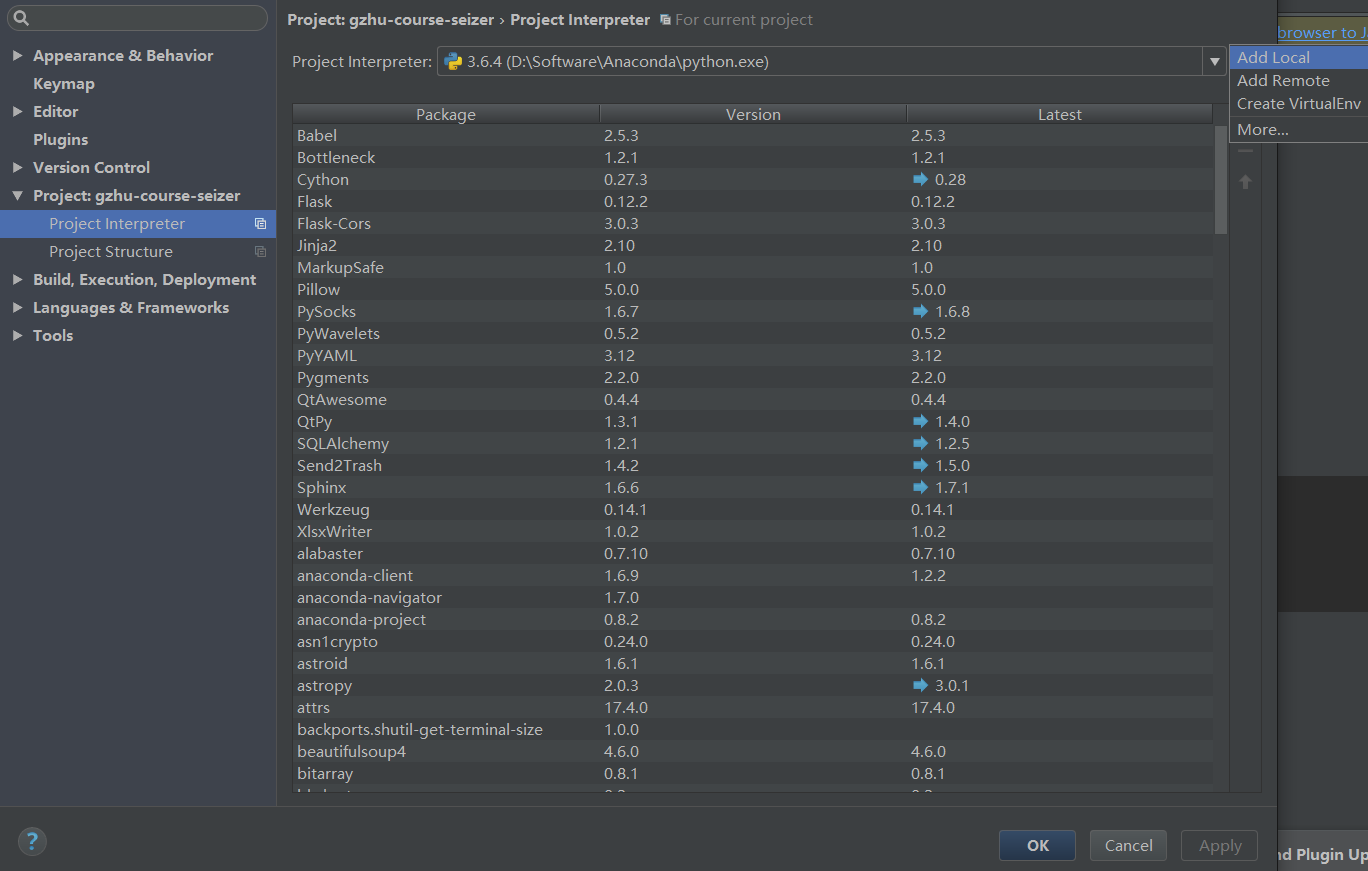
pycharm中导入selenium报错

现象: pycharm中输入from selenium import webdriver, selenium标红

原因1: pycharm使用的虚拟环境中没有安装selenium,

解决方法: 在pycharm中通过设置或terminal面板重新安装selenium

原因2: 当前项目下有selenium.py,和系统包名冲突导致,

解决方法,重命名这个文件

驱动及本地服务类异常

未找到响应的浏览器驱动

WebDriverException: Message: 'geckodriver' executable needs to be in PATH.

WebDriverException: Message: 'chromedriver' executable needs to be in PATH.

原因: 查找不到对应的浏览器驱动

解决方法: 下载浏览器对应版本的chromedriver或geckodrivergeckodriver

放到脚本当前文件夹下或将路径配置到环境变量中, 或放到Python目录的Scripts下(一般情况下Python的Scripts目录在环境变量中), 或使用浏览器选项options指定驱动路径

未找到浏览器

WebDriverException: Message Can not connect to the Service chromedriver
org.openqa.selenium.WebDriverException: Failed to connect to binary FirefoxBinary

原因: 在默认路径下未找到Firefox浏览器

解决方法: 重新安装Firefox浏览器

驱动和浏览器不匹配

SessionNotCreatedException: Message: session not created:
this version of ChromeDriver only supports Chrome version 76

原因: 当前使用chromedriver只支持Chrome76版本


解决方法: 查看本地Chrome浏览器的版本, 下载对应的chromedriver

驱动被防火墙拦截

WebDriverException: Message: Can not connect to the Service IEDriverServer.exe

原因: iedriverserver.exe被防火墙拦截

解决方法: 防火墙设置允许

连接不上chromedriver服务

WebDriverException: Message: Can not connect ot the Service chromedriver

原因: 脚本通过127.0.0.1这个ip访问本地chromedriver服务, hosts中未配置 127.0.0.1指向localhost

解决办法: 配置本地hosts, 添加:127.0.0.1 localhost

6.RemoteDriverServerException: 远程服务器异常, 解决方法: 确认webdriver.Remote()中的远程Webdriver服务是否OK

7. ErrorInResponseException: Webdriver服务器响应异常, 解决方法, 根据具体报错信息分析

找不到类异常: 定位/获取属性/切换警告框,Frame, 窗口

  1. NoSuchElementException: 找不到元素, 解决方法: 前面加上sleep等待后重试,或换一种定位方式
  2. NoSuchAttributeException: 元素没有这个属性, 解决方法: 确认定位到的元素是否目标元素, 检查属性拼写
  3. NoAlertPresentException:没有找到alert弹出框, 解决方法: 观察页面,查看是否有弹框出现, 加上等待或作为偶现元素处理
  4. NoSuchFrameException:没有找到指定的frame或iframe, 解决方法: 查看拼写或切换使用frame的id/name/index/定位到的frame
  5. NoSuchWindowException: 没找到窗口句柄指定的窗口, 解决方法: 查看使用的窗口句柄变量拼写
  6. UnexpectedAlertPresentException: 出现了弹框而未处理, 解决方法: 切换到警告框并处理, 如果偶现,使用try…except处理偶现弹框
  7. InvalidSwitchToTargetException: 切换到指定frame或窗口报错, 解决方法: 查看相应的frame或窗口是否能定位到
  8. UnexpectedTagNameException: 使用Tag Name不合法, 解决方法: 检查拼写或使用css selector/xpath
  9. TimeoutException:查找元素或操作超时, 解决方法, 稍后重试

元素操作异常类: 隐藏/不可操作状态

  1. ElementNotVisibleException:元素不可见异常, selenium不能直接操作隐藏元素, 解决方法: 加上等待, 使用正常步骤使元素显示, 或使用js找到该元素的祖先节点的隐藏属性(通常为styple=”display: none”), 移除该属性然后定位操作.
  2. StaleElementReferenceException: 陈旧元素引用异常, 页面刷新或跳转后使用了之前定位到的元素, 解决方法: 重新定位元素并操作
  3. InvalidElementStateException: 元素状态异常 元素只读/不可点击等, 解决方法, 等待或使用js移除元素readonly/disable等限制属性后操作
  4. ElementNotSelectableException:元素不可被选中, 解决方法: 确认原始是否为select标签, 是否禁用
  5. InvalidSelectorException: 使用的定位方法不支持或xpath语法错误, 未返回元素, 解决方法: 检查使用的元素定位器是否拆包, 使用find_element()方法是, 第一个参数为’class name’, ‘link text’, ‘particial link text’ ‘css selector’, 空格分开, 非下划线连接, 建议使用By.CLASS_NAME的方式. 使用chrome开发着工具+Ctrl+F搜索验证自己写的xpath语法.
  6. MoveTargetOutOfBoundsException: 使用ActionChains的move方法时移动到的位置不合适

Cookie存取相关异常

  1. InvalidCookieDomainException: Cookie相应的域名无效
  2. UnableToSetCookieException: 设置Cookie异常

IME输入法引擎异常

  1. ImeNotAvailableException: 服务器不支持输入法
  2. ImeActivationFailedException: 输入法激活异常

以上就是本文的全部内容,希望对大家的学习有所帮助,也希望大家多多支持脚本之家。
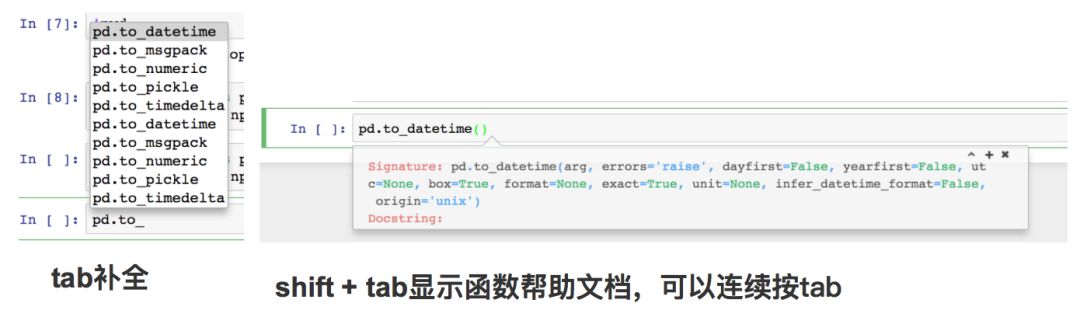
Anaconda建立新的环境,出现CondaHTTPError: HTTP 000 CONNECTION FAILED for url …… 解决过程

  2020.3.7准备scrapy,使用anaconda创建一个新的环境,执行“conda create -n scrapyEnv python=3.6”,结果出现了“CondaHTTPError: HTTP 000 CONNECTION FAILED for url <https://mirrors.tuna.tsinghua.edu.cn/anaconda/pkgs/main/win-64/current_repodata.json>”。以下是我的解决步骤。

一、电脑的环境

操作系统:windows10 64位

Anaconda版本:conda  4.8.2

二、解决步骤

1、打开Power Shell,执行“conda config –remove-key channels”命令,恢复Anaconda的源为默认。

因为我以为是清华的镜像有问题,所以想把镜像恢复为默认,然后重新执行“conda create -n scrapyEnv python=3.6”,发现问题依旧出现,只是出现的提示变为“CondaHTTPError: HTTP 000 CONNECTION FAILED for url <https://repo.anaconda.com/pkgs/main/win-64/current_repodata.json>”了。仔细对比之前的错误,发现除了镜像地址不一样以外,其他的描述是一样的,因此,我认为不是出现在镜像地址上。

2、恢复Anaconda镜像为清华的。在Power Shell上执行以下命令:

conda config --add channels - https://mirrors.tuna.tsinghua.edu.cn/anaconda/pkgs/free
conda config --add channels - https://mirrors.tuna.tsinghua.edu.cn/anaconda/pkgs/main

如果命令没有执行成功,请执行第1条里的“conda config –remove-key channels”。

3、恢复为清华的镜像以后,我再次执行创建环境的命令,依旧是不成功。于是尝试打开镜像的地址“https://mirrors.tuna.tsinghua.edu.cn/anaconda/pkgs/main”,打开以后看到的是以下界面:


似乎找到了问题所在:镜像地址应该加上”win-64″。

4、进入”C:\Users\Administrator“,打开“.condarc“,你将会看到以下代码:

ssl_verify: true
show_channel_urls: true

channels:
  - httpn://mirrors.tuna.tsinghua.edu.cn/anaconda/pkgs/main

将上述代码更改为

ssl_verify: true
show_channel_urls: true

channels:
  - https://mirrors.tuna.tsinghua.edu.cn/anaconda/pkgs/main/win-64

你也可能会在channels:下面看到 ”- default“,请删除它

5、修改完毕,再次执行”conda create -n scrapyEnv python=3.6”,涛声依旧啊!

6、继续翻阅网站,有网友说“一定要是http而不能为https!”,于是尝试修改一下,

ssl_verify: true
show_channel_urls: true

channels:
  - http://mirrors.tuna.tsinghua.edu.cn/anaconda/pkgs/free/win-64

再次执行”conda create -n scrapyEnv python=3.6”,成功啦!!!

7、根据在https://mirror.tuna.tsinghua.edu.cn/help/anaconda/上内容,最终的“.condarc”

ssl_verify: true
show_channel_urls: true

channels:
  - http://mirrors.tuna.tsinghua.edu.cn/anaconda/pkgs/free/win-64/
  - http://mirrors.tuna.tsinghua.edu.cn/anaconda/pkgs/main/win-64/
linux:

 - https://mirrors.tuna.tsinghua.edu.cn/anaconda/pkgs/main/linux-64/
 - https://mirrors.tuna.tsinghua.edu.cn/anaconda/pkgs/free/linux-64/

Anaconda简介与用法

Anaconda是个什么东东?

一、Anaconda 有什么用?

是一个安装、管理python相关包的软件,还自带python、Jupyter Notebook、Spyder,有管理包的conda工具,非常有用。

二、如何安装Anaconda?

很简单:

1、去官网https://www.anaconda.com/products/individual下载安装文件,不到500M。

2、双击安装。可以参考  http://www.360doc.com/content/20/0511/06/29876786_911481951.shtml  具体细节。

3、安装完成。

三、pip 和 conda 的区别

我简单的理解:

pip 是在python 环境中管理python包的工具

conda 是在conda环境中管理python包和其它包(例如C语言包)的工具

二者是不同的东西,不可以混用,它们安装的东西不在一个地方。

四、conda 常用的命令   (在终端中使用这些命令。打开图形界面AnacondaNavigator ,左侧Environment,点击小三角形,选中Open Terminal)

conda –version     #查看conda版本,验证是否安装

conda update conda   #更新至最新版本,也会更新其它相关包

conda update  –all  #更新所有包

conda update name  #更新指定的包

conda create -n env_name package_name #创建名为env_name的新环境,并在该环境下安装名为package_name 的包,可以指定新环境的版本号,

例如:conda create -n python2 python=python2.7 numpy pandas,创建了python2环境,python版本为2.7,同时还安装了numpy pandas包

activate env_name  #切换至env_name 环境

source activate env_name#以上不行使用这

deactivate   name  #退出环境(返回默认环境)

source deactivate env_name#以上不行使用这

conda info -e  #显示所有已经创建了的环境

conda create –name new_env_name –clone old_env_name #复制old_env_name为new_env_name

conda remove –name env_name –all #删除环境

conda list #查看所有已经安装的包

conda install package_name #在当前环境中安装包

conda install –name env_name package_name #在指定环境中安装包

conda remove — name env_name package #删除指定环境中的包

conda remove package #删除当前环境中的包

conda env list   #查看所有的环境

    conda env export > environment.yaml // 导出当前环境的包信息

conda env create -f environment.yaml // 用配置文件创建新的虚拟环境

五、python 虚拟环境

1)什么是虚拟环境?

把一部分内容独立出来,称之为容器。在容器中,安装我们自己想要的东西,比如不容版本的依赖包。各容器之间相互独立,互不影响。

比如下载完 Anaconda 之后,默认的就是 base 环境。

2)为什么要用虚拟环境?

因为在开发当中,我们需要根据不同的需求,下载不同的框架库,或者不同的版本。有了虚拟环境,我们可以为

不同的项目配置不同的运行环境,这样多个项目可以同时运行。

3)如何使用虚拟环境?

创建、激活、退出、删除。详见上面的命令,不再赘述。

注:新创建的环境除了python自带的一些官方包之外是没有其它包的,是一个比较干净的环境。例如我们可以在终端输入 python 打开 python的解释器试一下:


接下来我们可以在此环境中使用上述命令安装和卸载第三方包。

补充:Anaconda 所谓的创建虚拟环境,实际上就是在本地安装了一个真实的python环境,具体位置就在下面这个文件夹里


我们可以使用conda 命令随意切换当前的python 环境,使用不同版本的解释器和不同版本的包去运行python脚本。


六、Anaconda 与 pyCharm 连接


在工作环境中我们会集成开发环境去编码, 这里推荐JB公司的pycharm, 而pycharm也能很方便的和anaconda的虚拟环境结合

Setting => Project => Project Interpreter 里面修改 Project Interpreter , 点击齿轮标志再点击Add Local为你某个环境的python.exe解释器就行了


比如你要在learn环境中编写程序, 那么就修改为D:\Software\Anaconda\envs\learn, 可以看到这时候下面的依赖包也变成了learn环境中的包了.
接下来我们就可以在pycharm中愉快的编码了.

Anaconda 讲解 与 jupyter notebook 搭配

方便管理各类python库环境,来回切各类环境,因为有的时候别人的代码运行需要特定的python版本,所以新建一个python环境非常方便。

安装
Anaconda官方下载之后,Mac 下直接用命令行来安装吧:

$ bash ~/Downloads/Anaconda3-5.3.1-MacOSX-x86_64.sh // python3版本
1
安装过程中会让你输入yes 或 回车健,一路按照提示输入就行,没啥好犹豫的,安装后验证一下:

$ source ~/.bash_profile // 让环境变量生效

$ conda -V
# conda 4.7.12 // 输出conda 版本号

出现 conda 4.7.12 就说明安装成功。

常用命令使用
1、创建环境

$ conda create -n myenv python=3.7

生成指定python 3.7版本的环境,myenv 是环境名

2、多个环境建立好了,具体让那个生效呢?

$ conda activate myenv

有的环境利用的是 source activate ,这个跟安装的conda环境有关。指定要生效的环境名。

3、退出环境

$ conda deactivate

4、也可以删除 环境

$ conda remove –name myenv –all

5、查看环境列表

$ conda env list
1
6、查看环境中的安装库

conda list -n myenv
1
可以了解环境中

7、搜索包

conda search XXX
1
8、安装包

$ conda install XXX
1
这里的安装没有指定环境,其实是所有环境都可以使用这个库,相当于本地安装库一样

9、移除包

$ conda remove XXX

1
2
这个移除类似移除本地的库

10、安装库 到指定环境

$ conda install -n myenv XXX
1
库包管理
除了利用conda来安装包,还可以用pip来安装包,这是python 推荐的安装工具,
1、pip list
查看本地环境安装的那些包,你说如果我在一个conda 环境下可以使用这个命令,可以看到该环境安装的库包嘛?

2、pip install xxx
安装库包

pip install SomePackage==1.0.4 # 指定版本
pip install ‘SomePackage>=1.0.4’ # 最小版本
1
2
环境管理
新建环境是一个特别赶紧的环境,我们可以指定一个公共的环境,这里面放一些基本的库包,然后有特殊的库包要求,可以复制这个环境创建新环境,然后在新环境中安装特殊要求的库包版本号。
假设我们的基本库包为common环境,我们可以在这个环境中安装一些基本的包:

conda install scikit-learn

conda install numpy

conda install pandas

conda install lightgbm

通过复制功能,新建一个环境newenv:

conda create -n newenv –clone common

这样newenv 环境 包含了common 环境的库包,不需要额外安装。

环境管理注意要点
上面是相关命令,但是Anaconda环境管理还没讲到,这是他的主要优势,建议:

尽可能使用pip安装一些公有包
用conda 安装一些 特殊版本的包
经可能的给指定 环境 安装库
目前已经知道的知识点是:

conda创建的虚拟环境,只能创建当前与python版本相同的虚拟环境,所以它所含的包也是当前环境中pip安装过的包
有人补充:

conda install的package似乎是在anaconda\pkgs下,

而pip install的package是在anaconda\Lib\site-packages下。

推荐使用pip管理包(pip是python官方推荐的包管理器)
如果你在base环境,pip install的package应该就是安装在anaconda\Lib\site-packages下,然后其他虚拟环境下的使用python packages时优先搜索该虚拟环境下的package,如果没有它就搜索base环境下的package,也就是base环境下的package是可以被其他虚拟环境使用的,如果你进入其他虚拟环境下使用pip install,那么下载的包就只在这个虚拟环境中
配置镜像源
配置镜像源到目的是为来快速安装库包,毕竟配置为国内的镜像源下载库包更快,命令如下:

conda config –add channels https://mirrors.tuna.tsinghua.edu.cn/anaconda/pkgs/free/
conda config –add channels https://mirrors.tuna.tsinghua.edu.cn/anaconda/pkgs/main/
conda config –set show_channel_urls yes
使用 如下命令可以看到以下是否添加成功:

conda info
1
这个命令会打印出镜像信息。

与jupyter notebook关联
主要参考这篇文章,讲解的比较到位。https://zhuanlan.zhihu.com/p/29564719。

基本上安装来annaconda ,也安装了jupyter notebook,通过命令就可以打开:

jupyter notebook
1
启动之后浏览器就会跳出url :http://127.0.0.1:8888/tree 的页面,那就是该编辑器的页面,修改启动notebooks 在本地路径:

jupyter notebook –generate-config // 获取在电脑上的配置文件

输入命令后,得到配置文件路径:

Writing default config to: /Users/znss/.jupyter/jupyter_notebook_config.py
如果此文件是隐藏文件,mac 电脑下可能看不到,可以用vi打开该配置文件,或者设置显示隐藏文件,这样你就可以用sublime text 软件打开,主要是修改文件中的一个配置项:

## 用于笔记本和内核的目录。
c.NotebookApp.notebook_dir = ‘/Users/znss/Public/work/workspace/python/’
1
2
把这里的路径填写为你自己想要设置的路径就可以了,这样每次打开都会去找这个路径。

同时为了让jupyter notebook 可以使用conda创建的多个环境,如图所示:

使用conda安装插件,命令如下所示:

conda install nb_conda
1
插件一路yes 之后安装完毕,你可以启动,另一种方式:

python -m ipykernel install –user –name py3 –display-name “py3”

1
2
存在的问题
1、本地用pip 安装的库包,conda 创建的环境是不是都可以用?
2、conda base环境下安装的库包,是不是conda其他环境都可以用
3、进而存在,移除base包,其他所有创建的环境是不是都失效了,没有了环境?
————————————————

anaconda下改变python的版本
根据网页:http://python.jobbole.com/87522/

使用以下命令创建新环境:
conda create -n env_name list of packages

其中 -n 代表 name,env_name 是需要创建的环境名称,list of packages 则是列出在新环境中需要安装的工具包。

比如我现在的python版本是3.7,但是我想安装一个python 3.6的环境,则在anaconda prompt输入:
conda create -n py36 python=3.6

控制台会输出:

以及

# To activate this environment, use
#
# $ conda activate py36
#
# To deactivate an active environment, use
#
# $ conda deactivate
1
2
3
4
5
6
7
还是很酷很方便的。

现在激活这个新配置的环境:conda activate py36
输入python –version,可以看到:

(py36) C:\Users\dehen>python –version
Python 3.6.6 :: Anaconda, Inc.

(py36) C:\Users\dehen>
1
2
3
4
这时候打开anaconda navigator,发现多出来一个环境选择,太酷了。

这时候install 这个spyder就可以运行3.6版本下的程序了。


索性再配置一个python2.7的新环境:conda create -n py27 python=2.7
很快就显示配置完成并输出提示:

# To activate this environment, use
#
# $ conda activate py27
#
# To deactivate an active environment, use
#
# $ conda deactivate
1
2
3
4
5
6
7
所以,这样看来确实很方便,各个环境互相独立,都放在文件夹 D:\software\anaconda\envs 下:

还有,如果要删除我们配置的新环境,则:
conda env remove -n env_name

显示所有环境:
conda env list

当分享代码的时候,同时也需要将运行环境分享给大家,执行如下命令可以将当前环境下的 package 信息存入名为 environment 的 YAML 文件中。[6]
conda env export > environment.yaml

同样,当执行他人的代码时,也需要配置相应的环境。这时你可以用对方分享的 YAML 文件来创建一摸一样的运行环境。
conda env create -f environment.yaml
————————————————


anaconda没有重命名命令,因此使用克隆删除的方法

(1)进入旧环境
conda activate old_name
(2)克隆旧环境
conda create -n new_name –clone old_name
(3)退出旧环境
conda deactivate
(4)查看clone结果
conda info –envs
(5)删除旧环境
conda remove -n old_name –all
(6)查看最终结果
conda info –envs
————————————————
版权声明:本文为CSDN博主「不要清汤锅」的原创文章,遵循CC 4.0 BY-SA版权协议,转载请附上原文出处链接及本声明。
原文链接:https://blog.csdn.net/hello_program_world/article/details/111054427

安装完Minconda后运行命令conda create –name test python=3.6报如下错误

Collecting package metadata (current_repodata.json): failed

CondaHTTPError: HTTP 000 CONNECTION FAILED for url <https://mirrors.tuna.tsinghua.edu.cn/anaconda/pkgs/main/linux-64/current_repodata.json>
Elapsed: –

An HTTP error occurred when trying to retrieve this URL.
HTTP errors are often intermittent, and a simple retry will get you on your way.
SSLError(MaxRetryError(‘HTTPSConnectionPool(host=\’mirrors.tuna.tsinghua.edu.cn\’, port=443): Max retries exceeded with url: /anaconda/pkgs/main/linux-64/current_repodata.json (Caused by SSLError(SSLError(“bad handshake: Error([(\’SSL routines\’, \’tls_process_server_certificate\’, \’certificate verify failed\’)])”)))’))
1
2
3
4
5
6
7
8
从错误信息看是无法获取资源https://mirrors.tuna.tsinghua.edu.cn/anaconda/pkgs/main/linux-64/current_repodata.json, 进而通过wget命令尝试获取该资源

>>wget https://mirrors.tuna.tsinghua.edu.cn/anaconda/pkgs/main/linux-64/current_repodata.json

ERROR: cannot verify mirrors.tuna.tsinghua.edu.cn’s certificate, issued by “/C=US/O=Let’s Encrypt/CN=Let’s Encrypt Authority X3”:
Issued certificate not yet valid.
To connect to mirrors.tuna.tsinghua.edu.cn insecurely, use ‘–no-check-certificate’.
1
2
3
4
5
所以关闭conda的ssl验证即可, 输入一下命令

conda config –set ssl_verify false

root@debian:/etc/init.d# cat ~/.condarc
channels:
– https://mirrors.tuna.tsinghua.edu.cn/anaconda/pkgs/main/
– https://mirrors.tuna.tsinghua.edu.cn/anaconda/pkgs/free/
– defaults
show_channel_urls: true
ssl_verify: false

最后还要关掉default
版权声明:本文为CSDN博主「lbzz」的原创文章,遵循CC 4.0 BY-SA版权协议,转载请附上原文出处链接及本声明。
原文链接:https://blog.csdn.net/bitbitbyte/article/details/105496946

用selenium库爬取58同城售房信息

代码来了

#引入selenium、 pandas、openpyxl库
from selenium import webdriver
import pandas as pd
import openpyxl
#定义存储变量
xq=[]
hxmj=[]
dj=[]
zj=[]
#获取网页源代码
for i in range(5):
url=’https://cd.58.com/ershoufang/pn’+str(i)+’/’
browser = webdriver.Chrome()
browser.get(url)
#解析源代码,提取所需数据信息
for i in browser.find_elements_by_class_name(‘sendsoj’):
xq.append(i.find_elements_by_class_name(‘baseinfo’)[1].text)
hxmj.append(i.find_elements_by_class_name(‘baseinfo’)[0].text.replace(‘\n’,”))
dj.append(i.find_elements_by_class_name(‘price’)[0].find_elements_by_class_name(‘unit’)[0].text)
zj.append(i.find_elements_by_class_name(‘price’)[0].find_elements_by_class_name(‘sum’)[0].text)
pd.DataFrame({‘小区’:xq,’户型/面积’:hxmj,’单价’:dj,’总价’:zj})
data=pd.DataFrame({‘小区’:xq,’户型/面积’:hxmj,’单价’:dj,’总价’:zj})
writer=pd.ExcelWriter(’58.xlsx’)
data.to_excel(writer,’爬虫数据’)
writer.save()